
Installation Guide


16
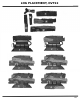
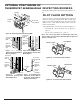
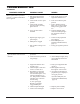
Figure 10 - Removing Thermostat Sensing Bulb
Retaining
Clamp
Thermostat
Sensing Bulb
Capillary
Adhesive-
Backed
Mounting
Clip
Figure 11 - Locating
Thermostat Sensing Bulb on
Masonry Fireplace
Thermostat
Sensing
Bulb
Adhesive-
Backed
Mounting
Clip
Thermostat
Sensing
Bulb
Figure 12 - Locating Thermostat
Sensing Bulb on Factory-built
Metal Fireplace
Adhesive-
backed
Mounting
Clip
Glass Doors
Thermostat
Sensing
Bulb
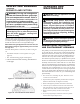
Figure
13
- Installing
Thermostat Sensing Bulb
behind Glass Doors
Capillary
Thermostat
Sensing Bulb
Do Not
Crimp
Capillary
Adhesive-
backed
Mounting
Clip
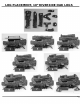
Figure 14 - Positioning the
Thermostat Sensing Bulb in
the Vertical Position with the
Capillary at the Bottom
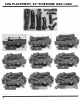
OPTIONAL POSITIONING OF
THERMOSTAT SENSING BULB
Check pilot flame pattern and burner flame patterns of-
ten.
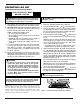
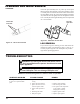
INSPECTING BURNERS
PILOT FLAME PATTERN
Figure 15 shows a correct pilot flame pattern. Figure 16
shows an incorrect pilot flame pattern. The incorrect pilot
flame is not touching the flame sensor. This will cause the
flame sensor to cool. When the flame sensor cools, the
heater will shut down.
If pilot flame pattern is incorrect, as shown in Figure 16:
• turn heater o
( See To
Turn
Off Gas To Appliance,
page 15).
•
see Cleaning and Maintenance, page 17.
Note: The correct pilot flame on natural gas units will
have a slight curve, but flame should be blue and have no
yellow or orange color.
Figure 15 - Correct Pilot Flame Pattern
Figure 16 - Incorrect Pilot Flame Pattern
Thermocouple
Pilot Burner
Pilot Burner
Thermocouple