
Installation Guide
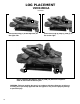

INSTALLATION
Continued
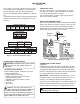
5. Retighten and adjust the location of the
gas control as necessary. The gas control
should be level, with the control knob to the
front.
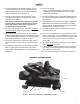
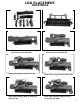
Figure 6 - Installing Inlet Fitting and Gas
Connector Tube (Heat Shield Removed
for Clarity)
Gas Control Valve
Propane/LP Gas Conversion
To convert to Propane/LP gas, the regulator pres-
s ure must be reset. Also, burner inlet fitting and
pilot orifice must be replaced. The Propane/ LP
burner inlet fitting is supplied with the orifice installed
Burner Inlet Fitting
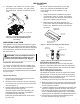
1. Remove pilot assembly burner pan by remov-
ing two screws on bracket.
2. Unthread control valve and burner inlet fitting
from burner tube by turning valve counterclock
wise (see Figure 7) .
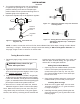
Remove Natural Gas inlet fitting from control
valve assembly
(see Figure 8)
.
DO NOT remove orifice from this fitting. The
Propane/LP burner inlet fitting is provided in
the hardware kit (see Figure 8).
3.
Be sure to use the correct orifice for your app-
liance. The orifice kit included with this appli-
ance contains an orifice installed in an air
mixer fitting.
4.
Using thread sealant (resistant to the action
of propane/LP gas) on smaller end of fitting,
screw the burner inlet fitting into outlet side of
gas control. T
ighten using a wrench.
5 . Rethread valve and fitting assembly into
burner tube until fully threaded and level with
burner pan. Reattach valve cover with two
(2) screws.
NATURAL GAS
COMPONENTS
Burner Inlet Fitting
for Natural Gas
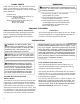
Figure 7 - Burner Inlet Fitting and Pilot Prifice
Natural Gas
Pilot Orifice
Figure 8 - Burner Inlet Fittings shown with orifice
NATURAL
GAS
FITTING
PROPANE/LP
GAS FITTING
Orifice for
Natural Gas
Injector for
Propane/LP Gas
7
NG to LP Regulator Selection
The appliance regulator can be converted from Natural
Gas to LP/gas. If connecting
to
a Propane
gas system,
regulator must be switched prior to use. Follow thethe
steps below to select Propane/LP gas.
1. Carefully remove the logs from the burner assembly.
2. Make sure gas is turned off to the unit and disconnect
burner assembly from gasline. Removeburner assemb-
ly from fireplace or firebox.
3. Locate the regulator cap on the appliance regulator (see
Figure 9 Unscrew by hand and remove
the cap from the regulator.(The
pressure selecting
screw is attached to the regulator cap.) The pressure
selecting screw is supplied in the Natural Gas position.
4. Unscrew and remove the pressure selecting screw
from the regulator cap (see Figure 9 ).
WARNING: Only a qualified installer or
service technician can perform gas con-
version and connection to gas supply.
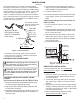
SELECTING GAS TYPE
This appliance can be used with Propane/LP gas or
Natural Gas. It is shipped from the factory adjusted
for use with Natural Gas. Main burners are equipped
with fixed orifices, located at the inlet of the burner
pan (see Figure 7).
for your log set.
Retain the removed Natural Gas components
for future use.
Pilot Orifice Replacement
Disconnect the pilot supply tube from the pilot (See
Figure 7). Replace the pilot orifice with the Propane/LP
pilot orifice included with the Gas conversion kit. Retain
the removed orifice for future use.
on Page 8)