
Installation Guide

REMOTE OPERATION
NOTICE: You must light the pilot be-
fore using the hand-held remote
control unit. See
Lighting Instruct-
ions on page 14.
After lighting, let pilot flame burn for about
one minute. Turn control knob to ON posit-
ion. Adjust flame adjustment knob anywhere be-
tween HI and LO. Slide the selector switch to
the REMOTE position (see Figure 10 ) .
The burner may light if hand-held
remote was on when selector switch was last
turned off. You can now turn the burner on and
off with the hand-held remote control unit.
IMPO RTANT
: Do not leave the selector switch
in the REMOTE or ON position when the pilot
is not lit. This will drain the battery.
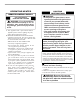
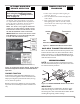
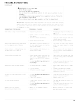
Figure 10 - Setting the Selector Switch, Control Knob,
and Flame Adjustment Knob for Hand-Held Remote
Operation
Selector Switch in Remote Position (Optional Remote Control)
Transmission
light
Side
Slide Switch
ON/OFF
Key
Note:
BACKUP FUNCTION
If the batteries in the transmitter (Hand Set) or rec-
eiver are low, the appliance can be switched on man-
ually by moving the 3 position slide switch (see Fig-
ure 10) to the ON position.
Replace or remove low batteries as soon as possible
to prevent corrosion damage to remote control acces-
sory
15
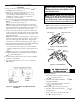
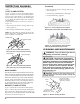
HAND HELD TRANSMITTER OPERATION
Move the side Slide Switch into the ON position. (tow-
ards the flat end of the unit).Press and hold the control
button (see Figure 11) on the Hand Held Remote until
burner turns on. Press and hold the control button again
until the burner turns off.
Figure 11 - ON/OFF Hand Remote Control Unit
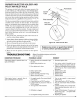
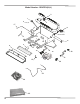
WIRING DIAGRAM
NOTE:
For proper operation of optional accessories,
the wires from the thermopile to the control valve must
be connected exactly as shown.
Thermopile
IMPORTANT!
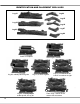
After any alteration or adjustment to the Gas Log Set,
make sure the logs are in the correct locations. Make
sure the logs are clear of the main burner flames. Flame
touching the logs may produce sooting!
Figure 12 - WIRING DIAGRAM Remote Control Unit
OPTIONAL HAND HELD
1.
Follow steps 1 through 5 under Lighting In-
structions, page 14.
2.
Press in and hold control knob and light pilot
with a match.
3.
Keep control knob pressed in for 30 seconds
after lighting pilot. After 30 seconds, release
control knob. Now follow step 8 unde Lighting
Instructions, Page14
MANUAL LIGHTING
PROCEDURE
Be sure to
remove
(or cut) the
jumper wire
when instal-
ling the re-
mote control.