
Installation Guide

FOR YOUR SAFETY
READ BEFORE LIGHTING
WARNING: Keep flue open when operating unit.
WARNING: If you do not follow these instruct-
ions exactly, a fire or explosion may result caus-
ing property damage, per
sonal injury or loss of life.
A. This appliance has a pilot which must be light-
ed by hand. When lighting the pilot, follow
these instructions exactly.
B. BEFORE LIGHTING smell all around the app-
liance area for gas. Be sure to smell next to
the floor because some gas is heavier than air
and will settle on the floor.
WHAT TO DO IF YOU SMELL GAS
• Do not try to light any appliance.
• Do not touch any electric switch; do not use
any phone in your building.
• Immediately call your gas supplier from a
neighbor’s phone. Follow the gas supplier’s
instructions.
• If you cannot reach your gas supplier, call the
fire department.
C. Use only your hand to push in or turn the gas
control knob. Never use tools. If the knob will
not push in or turn by hand, don’t try to repair
it, call a qualified service technician or gas sup-
plier. Force or attempted repair may result in a
fire or explosion.
D. Do not use this appliance if any part has been
under water. Immediately call a qualified service
tech
nician to inspect the appliance and to re-
place any part of the control system and any gas
control which has been under water.
LIGHTING INSTRUCTION
1. STOP! Read the safety information on the
left side of this page.
2. Make sure equipment shutoff valve is fully
open.
3. Press in and turn control knob clockwise
to the OFF position.
4. Wait five (5) minutes to clear out any gas.
Then smell for gas, including near the floor.
If you smell gas, STOP! Follow “B” in the safety
information, to the left. If you don’t smell gas, go
to the next step.
5. Press in and turn control knob counter clockwise
-
to the PILOT position.
Press in control knob for five (5) seconds (see
Figure 13).
Note: You may be running this log set for the first
time after hooking up to gas supply. If so, the con-
trol knob may need to be pressedin for 30 seconds
ormore. This will allow air to bleed from the gas
system.
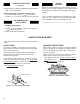
6. With control knob pressed in, use a match or a
grill lighter to light pilot. Visually locate the pilot
(see Figure 12) on the edge of the burner pan
to look for flame. If needed, repeat operation
until the pilot lights.
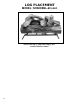
Figure 13 - Control Knob Location
If the pilot will not stay lit after several tries, turn the
gas control knob to "OFF" and call your service
technician or gas supplier.
7.
8.
Keep control knob
pressed in for 30 seconds af-
ter lighting pilot.After 30 seconds, release the
control knob.
• If control knob does not pop out when released,
contact a qualified service person or gas sup-
plier for repairs.
Note: If pilot goes out, repeat steps 3
through 8.
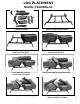
Figure 12 - Thermocouple and Pilot
Pilot
Thermocouple
19
OPERATION
Control Knob
Heat Shield
Elbows
Pal Nut