
Specifications
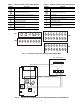

30
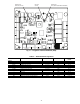
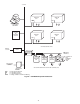
Scrolling Marquee Display Operation — The key
to the setup, operation, and diagnostics for the 48/50A series
ComfortLink™ Control System is the Scrolling Marquee dis-
play. All units are shipped from the factory with the Scrolling
Marquee display, which is located in the main control box. See
Fig. 14.
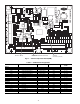
In addition, the ComfortLink control also supports the use
of the hand held Navigator which can be plugged into the J11
jack in the main control box on TB3. The Navigator can also be
plugged into the J11 jacks located on the ECB1 and ECB2
boards located in the auxiliary box behind the filter access door
on the opposite end of the unit.
Both displays provide the user with an interface to the
ComfortLink control system. The displays have UP and
DOWNarrowkeys,andanESCAPEkeyandanENTERkey.
These keys are used to navigate through the different levels of
the display structure. The Navigator and the Scrolling Marquee
operate in the same manner, except that the Navigator has
multiple lines of display and the Scrolling Marquee has a single
line. All further discussions and examples in this document will
be based on the Scrolling Marquee display.
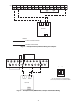
The 4 keys are used to navigate through the display
structure, which is organized in a tiered mode structure as
shown in Tables 11-22. If the buttons have not been used for a
period the display will default to the AUTOVIEW display
category as shown under the RUN STATUS category. To show
the top-level display, press the ESCAPE key until a blank
display is shown. Then use the UP and DOWN arrow keys to
scroll through the top-level categories. These are listed at the
top of Table 11 and will be indicated on the Scrolling Marquee
by the LED next to each mode listed on the face of the display.
When a specific mode or sub-mode is located, push the
ENTER key to enter the mode. Depending on the mode, there
may be additional tiers of categories. Continue to use the UP
and DOWN keys and the ENTER keys until the desired
display item is found. At any time, the user can move back a
mode level by pressing the ESCAPE key. Once an item has
been selected the display will flash showing the item, followed
by the item value and then followed by the item units (if any).
Items in the Configuration and Service Test modes are pass-
word protected. The display will flash PASS and WORD when
required. Use the ENTER and arrow keys to enter the 4 digits
of the password. The default password is 1111.
Pressing the ESCAPE and ENTER keys simultaneously
will scroll a clear language text description across the display
indicating the full meaning of each display acronym. Pressing
the ESCAPE and ENTER keys when the display is blank
(MODE LED level) will return the display to its default menu
of rotating AUTO VIEW display items. In addition the pass-
word will be disabled requiring that it be entered again before
changes can be made to password-protected items.
Changing item values or testing outputs is accomplished in
the same manner. Locate and display the desired item. Press the
ENTER key to stop the display at the item value. Press the
ENTER key again so that the item value flashes. Use the arrow
keys to change the value of state of an item and press the
ENTER key to accept it. Press the ESCAPE key and the item,
value or units display will resume. Repeat the process as
required for other items. See Tables 11-22.
Depending on the unit Model, Factory-Installed Options
and Field-Installed Accessories, some of the items in the
various Mode categories may not apply.
CCN Tables and Display — In addition to the unit-
mounted Scrolling Marquee display, the user can also access
the same information through the CCN tables by using the
Service tool or other CCN programs. Details on the CCN
Service tool tables are summarized in Appendix A. The
variable names used for the CCN tables and the Scrolling
Marquee tables may be different and more items are displayed
in the CCN tables. As a reference, the CCN variable names are
included in the Scrolling Marquee tables and the Scrolling
Marquee names are included in the CCN tables in Appendix A.