
User's Manual


January 2010 IL42-4036A
3
Placing the A3 ALPHA meter with Wireless WIC into service
See IL42-4001Q or later for the A3 ALPHA meter installation instructions. When planning the meter installation,
consider the following additional guidelines:
■ Since the Wireless WIC and EA_LAN (if present) are high frequency communication devices, site the meter so
that the front of the meter has the best possible view of the surrounding terrain.
■ Do not place metal structures (other than the meter socket and related cabling) within 20 cm of the meter.
After the A3 ALPHA meter is installed and powered as instructed in IL42-4001Q or later, the installation is complete. If
on-site verification of the Wireless WIC operation is desired, the following steps may be taken:
To verify that the Wireless WIC is operational:
1. After installing and powering the A3 ALPHA meter, wait approximately 5 minutes for the Wireless WIC to
connect to the cellular network and initialize.
2. Using Metercat and an optical probe connection, perform a diagnostic read. For information on using
Metercat and performing diagnostic reads, see the Metercat software documentation or online Help.
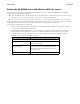
3. Once the diagnostic read is performed, select the Special Option Board section. Several operational
parameters are provided, including the following:
Item Expected status
WAN Wireless Status
Status Connected means the Wireless WIC is registered
to the cellular network
Received Signal Strength
Indication (RSSI)
The RSSI may vary between 0 and 31, with 31
indicating the best possible signal strength. An
RSSI value of 99 indicates an unknown or non-
detectable signal.
WAN IP address The IP address provided by the cellular network.
Preliminary