
User Manual
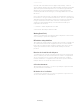
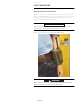
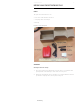
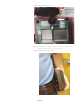
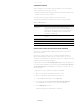

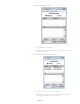
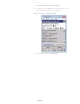


Table Of Contents

Unified Field Tool 7
CHARGING THE DEVICE
Before using the UFT, it must be charged using the enclosed charging
cable. Charge time can take up to 7 hours.
• Insert the USB end of the charging cable into the charger and the small
end into the device’s micro USB port.
• Plug the male end of the charger into an electrical outlet.
Charging should begin immediately, indicated by a solid green light.
PAIRING THE UFT WITH THE FW950 BLUETOOTH HANDHELD
If the device is shipped with the handheld, the two devices have been
paired at the factory.
If the UFT is a replacement device, it must be paired with the FW950
Bluetooth handheld before EA_Inspector or EA_Installer can use it to
communicate with LAN devices. Each time the device is fully discharged, it
must be paired again with the handheld.
Pairing is done using the elsterRegKeyEdit application. This application
is located on the handheld by selecting the options DiskOnChip, Windows,
and ElsterRegKeyEdit. Press Enter after selecting each option to move to
the next window.
Complete these steps to pair the UFT with the handheld.
1 Make sure the FW950 handheld is not in the cradle.
2 Make sure the Bluetooth Beltclip is charged and on.
3 On the handheld main window, select My Device.
4 Select these options DiskOnChip, Windows, ElsterRegKeyEdit,
pressing Enter after each one to move to the next window.
5 Select RegKeyEdit to run it.
The Elster Registry Key Edit window is displayed.
Table 1. LED indicators
LED color Description
Green solid Comes on immediately when charging cable is
plugged into the device
’s USB port and charger, and
the charger is plugged into an electrical outlet. Does
this light stay on with the amber solid light until
charging is completed?
Amber solid Indicates the device is charging; goes off when fully
charged
Green blinking Indicates a good charge
Yellow blinking Indicates that charge is less than 50%
Red blinking Indicates that charge is less than 10%
Preliminary