
Installation Instructions

August 2005 IL42-4026D
Elster Electricity, LLC
Raleigh, North Carolina USA
+1 800 338 5251 (US Technical Support)
+1 800 257 9754 (US Sales Support)
+1 919 212 4800 (US Main)
+1 905 634 4895 (Canada Main)
support@us.elster.com
www.elsterelectricity.com
REX
™
Meter Installation Instructions
General
This leaflet contains installation instructions for the REX residential electronic watthour
meter with the following form factors:
■ self-contained: Forms 1S, 2S, and 12S
■ transformer-rated: Forms 3S and 4S
All meters are calibrated and sealed before shipment. For proper installation, accuracy, and
maximum life of the meters, use the following procedures.
WARNING
!
Use authorized utility procedures to install and service metering equipment. Dangerous
voltages are present. Equipment damage, personal injury, or death can result if safety
procedures are not followed.
WARNING
!
When using the REX meter with the internal service control switch, follow authorized utility
procedures to reconnect electrical service. Property damage, personal injury, or death can
result if safety precautions are not followed.
Installing the REX Meter
1. Make sure the meter to be installed matches service type (that is, form), current
class, capacity required, and service socket.
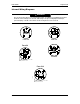
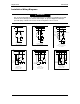
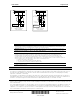
2. Check the socket and verify that the wiring is correct. See “Internal Wiring
Diagrams” on page 2 and “Installation Wiring Diagrams” on page 3 for all wiring
diagrams.
3. Make sure that the voltage disconnect or test link on the back of the meter is closed,
if installed.
4. Line up the meter blades to the socket jaws and rock the meter into place. Make
sure that the meter is in the upright position.
5. Make sure the LCD turns on and the energy use indicator flashes if load is present.
If load is applied, check that the pulse arrows on the LCD are blinking. The LCD has
two pulse arrows. The arrow pointing to the left indicates energy received; the
arrow pointing to the right indicates energy delivered. For more information, see the
technical manual for your meter.
6. Apply all seals and record any necessary information.
IL42-4026D