
User's Manual


Chapter 2 Setup
Chapter 2: MMI Setup
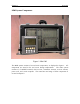
The MMI is transported with all components contained in the carrying case. Before use,
these components must be unpacked and connected. Setup is simple and fast, and the
entire setup operation should take no more than five minutes. Use the following
instructions for a fast and trouble free setup:
• Unlatch the two latches on the rear cover door. Open the door slightly and then slide
the door off the two hinge pins. Now remove the GPS receiver, power cable, and
both antennas from their storage pouches. Store this door in a safe place.
• Next, unlatch the two latches on the front cover door. As above, remove the door,
then remove the handheld terminal and connecting cable, and the desired route disk
from their storage pouches. Store this door in a safe place.
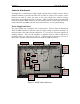
• Now connect the transmit antenna to the appropriate connector and finger tighten
until snug. Next connect the receive antenna by pushing in on the connector and
twisting ¼ turn until it locks. Both antennas use unique connectors which are keyed,
so they cannot be connected backwards.
• Place both antennas on the top of the vehicle, and make sure that they are separated by
approximately 3 feet. A separation distance of two arms length apart is sufficient.
Typically the transmit antenna is placed at the front of the vehicle, and the receive
antenna at the rear. The coaxial cable may be routed over the top of the door on some
vehicles, or it may be necessary to route the cable through a slightly opened window.
Caution: If routing the cable over the top of the door, be certain to inspect the
distance between the top of the door and the vehicle frame to ensure there is adequate
clearance for the cable to avoid crushing it.
• Next connect the GPS receiver to the appropriate connector and finger tighten until
snug. Next moisten the suction cups on the GPS mount, and attach the unit to the
outside top of the vehicle windshield. As with the transmit and receive antennas, the
signal cable may routed over the top of the door, or through a window.
• The handheld terminal may now be connected using the supplied cable. Either end of
the cable may be connected to the terminal.
• Finally, connect the power cable to the appropriate MMI rear connector and finger
tighten until snug. Continue by inserting the opposite connector into the vehicle
cigarette lighter port.
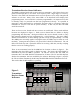
Now the MMI is properly setup and ready to receive a route disk. Please take time to
read the following section to become familiar with the various controls and indicators
found on the MMI.