
User's Manual


Chapter 4 Operation
REDO (key R): This option simply re-initializes each receiver channel with
the frequencies displayed in the frequency grid.
XMIT (key T): This allows the factory-set transmitter frequency to be adjusted.
This command requires a special password acquired from
American Meter Company to enable operation.
QUIT (key Q): As with most menus, this exits out of the current menu.
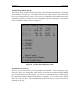
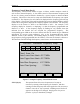
SCAN (key H): This option is used to enable or disable the frequency scan
option for channel #1, and allows the range of the frequency
scan to be set. Upon pressing the ‘H’ key, The ON/OFF field of
the scan control line contains a flashing cursor. Pressing the ‘0’
key disables the scan feature, and pressing the ‘1’ key enables it.
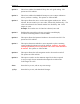
If the scan control is enabled, then two additional lines will appear
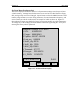
below the scan control status line. Pressing the ENTER key will
move the cursor to the lower scan limit line. Enter the frequency
here as with other frequency control entries. Pressing ENTER
again will move the cursor to the upper scan limit line, which by
default is set to the first channel below the lowest frequency
enabled on channels 2-8. Pressing the ENTER key a final time
will
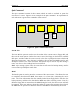
finish the scan control data entry. Any time the frequency scan
option is enabled, a flashing ‘S.S’ will appear in the frequency
grid for channel 1 to indicate that the frequency for channel 1
is constantly changing.
Keys 1-8: Pressing any of these keys will invoke the individual frequency
control entry. This allows for a single receiver channel to be
programmed to an arbitrary frequency, without disturbing the
frequencies of any other channel.