
User's Manual

Elpas High-Risk Security Bracelet – User Guide
www.elpas.com
Page 2 of 3
V2/Sept 2012
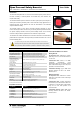
Initial Activation
The bracelet is shipped from the factory in Sleep Mode
to conserve battery power during shipping.
To activate the bracelet from sleep mode both of the
following described methods can be used:
Button Press
Orient the tag front-cover
side up. Next press & hold
down the call button for at
least 5 seconds.
Tamper Band Method
Touch the two ends of the
tamper wrist band together.
Pin Shorting
Place the bracelet back
cover side up. Using the tips
of a metal tweezers, touch
the two metal contacts
simultaneously
If the wake-up process is successful the LED Indicator
on the front of the bracelet will illuminate for 3 seconds.
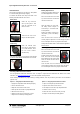
Battery Replacement
Change the bracelet’s status in the
host RTLS application to ‘Inactive’.
Place the bracelet back cover side
up. Then Unscrew the 4 screws and
remove the back cover.
Slide the battery out from under
the battery holder. Dispose of
used battery in accordance with
local regulations.
Replace the battery ensuring that
the positive (+) side of the battery
faces up.
Close the back cover such that the screw holes are
correctly aligned. Tighten the 4 screws snugly into place.
Do not over-tighten as this may strip the case threads.
Change the bracelet’s status in the host RTLS application
back to ‘Active’.
Attaching the Hospital Band Adapters
Place the bracelet back cover side
up. Then Unscrew the 4 screws and
remove the back cover.
Position the bracelet front cover side
down. Next insert the two hospital
band adapters into the grooved slots
which are located on either side of
the front cover.
Close the back cover such that the screw holes are
correctly aligned. Tighten the 4 screws snugly into place.
Do not over-tighten as this may strip the case threads
Cleaning & Disinfection Procedures
Use an appropriate antibacterial disinfectant such as Dispatch
®
Hospital Cleaner Disinfectant with Bleach from Caltech
Industries, Inc (http://www.caltechind.com) to clean the High-Risk Security Bracelet.
Since ‘Cleaning Procedures’ may vary according to facility guidelines, thus the procedures given below are for illustrative
purposes only:
Option 1 – Using Dispatch Disinfectant Spray
1. Lightly wet a disposable towel with Dispatch spray
2. Do not saturate the towel
3. Wipe the outer surfaces of the sensor
4. Next wipe the sensor with a dry disposable towel
5. Allow the sensor to air dry
6. Return the clean sensor to inventory or usage
7. Dispose of used towels per facility policies
Option 2 – Using Dispatch Disinfectant Towels
1. Open a new Dispatch pre-moistened towel
2. Wipe the outer surfaces of the sensor
3. Next wipe the sensor with a dry disposable towel
4. Allow the sensor to air dry
5. Return the clean sensor to inventory or usage
6. Dispose of used towels per facility policies