
User's Manual

Low Frequency Exciters - Installation Guide _________________________________________________________________________________________
Page 5 of 8
DTA03N01_V13
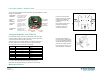
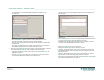
The General tab of the corresponding Badge Configuration form appears in the
EV2 setup pane
Update the Badge Name so that it will denote a particular LF exciter.
Enter an ID Number of 000D##, where ## is the LF Exciter ID as set on the
DIP switch on the main circuit board of the device during installation.
Select the Badge Model that was created in the previous step) from the badge model
pull-down menu.
Press Apply; the badge parameters are saved. Then Repeat Step 2 (in is entirety) for
each additional LF Exciter that is to be associated with the new alert.
4. Define a new Operational RF Status alert (using the Lost Away alert) that is to supervise
the operational RF status of the LF exciters as detailed in the following steps:
Right-click on the All Alerts branch of the component tree. Select Add By Type; the
Add Object box appears.
Select the Lost Away icon by clicking on it. Then press Add; a new Lost Away alert
sub-branch (with default name) appears in the components tree.
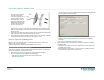
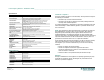
The General tab of the corresponding Alert Configuration form also appears in the
EV2 setup pane.
Update the Name of the Device Away alert so that the new name will denote the
intended usage.
Enter a Message that is to be sent to the designated client machines when the alert
is trigged. Then press Apply; the general parameters are saved.
Access the Inputs tab. Next expand the Badges tree in the Badges Tree pane to
show all the of the defined badges including the LF Exciters.
Select the LF Exciter(s) that are to be supervised.
Enable the All Status Types option in the Status Tree pane.
(Optional) Increase/Decrease the Time Interval (seconds) after the device has
been declared 'Lost/Away' that is to transpire before alert is triggered in the 'Time
Required' value field.
(Optional) Increase/Decrease the Time Interval (seconds) that is to transpire
before the alert is cleared in the 'Automatically clear after' value field.
Press Apply; the input parameters are saved. Complete the Outputs and Schedule
tabs of the Alerts Configuration form as required.