
User's Manual


Elpas3 Personnel Identity Badge – User Guide
www.elpas.com
Page 2 of 4
V3/Jan 2016
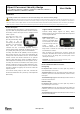
Badge Activation - Initial Usage
1. Orient the badge back-cover side
up. Then press & hold down the
larger of two emergency call
buttons for
at least 6 seconds
2. If the activation process was
successful the red LED on the
front of the badge will illuminate
for about six seconds
.
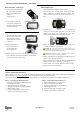
Attaching a Paper Photo ID
1. Ensure that the photo ID paper
label is trimmed so that it lies
flatly (picture/text side up) in
the recessed area on the front
of the badge.
2. Peel off the protective
layer on the front and
rear of the label cover
(P/T: 5-PBA90004).
3. Finally, remove the label cover’s adhesive backing and carefully
place it (adhesive edge down) onto the badge so that it neatly
holds the paper label correctly in place.
Battery Replacement
1. Temporarily disable the Badge in the Eiris software.
2. Place the badge back cover side up on a clear dry level surface.
Using a Phillips-type screwdriver that fits the battery cover
screws, unscrew the 4 screws that holds the battery cover in
place.
3. Separate the battery cover from the back of the badge by
inserting a small screw driver into either of the square slots
adjacent to the battery cover. Gently lever the screw driver
outwards until the battery cover releases from the badge.
4. Remove the worn-out battery from the badge and dispose of it
according to manufacturer’s instructions.
CAUTION! After removing the battery please wait at least 30 seconds
before installing the replacement battery so as to not cause damage to the tag
or to negatively affect the tag’s operational performance.
Caution! Risk of explosion if battery is replaced by an incorrect type.
Dispose of used batteries according to the instructions.
5. Insert a new battery into the compartment, ensuring that that the
positive (+) side of the battery faces up.
6. Align the battery cover so that its flat edge fits correctly into the
badge’s back cover prior to seating the cover into place.
7. Once the battery cover is in place, tighten its 4 screws into place.
8. Finally, in Eiris, re-enable the Badge.
Cleaning & Disinfection Procedures
Elpas recommends that you use an appropriate antibacterial disinfectant such as Dispatch® Hospital Cleaner Disinfectant with Bleach from
Caltech Industries, Inc. (http://www.caltechind.com) to clean the Elpas Personnel Identity Badge Badges.
Since ‘Cleaning Procedures’ may vary according to facility guidelines, thus the procedures given below are for illustrative purposes only:
Option 1 – Using Dispatch Disinfectant Spray
1. Lightly wet a disposable towel with Dispatch spray
2. Do not saturate the towel
3. Wipe the outer surfaces of the badge
4. Next wipe the badge with a dry disposable towel
5. Allow the badge to air dry
6. Return the clean badge to inventory or usage
7. Dispose of used towels per facility policies
Option 2 – Using Dispatch Disinfectant Towels
1. Open a new Dispatch pre-moistened towel
2. Wipe the outer surfaces of the badge
3. Next wipe the badge with a dry disposable towel
4. Allow the badge to air dry
5. Return the clean badge to inventory or usage
6. Dispose of used towels per facility policies