
User's Manual
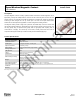

Elpas Wireless Magnetic Contact – Installation Guide
www.elpas.com
Page 3 of 4
V3/April 2013
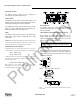
Step 4: Hold the base against the mounting surface and mark the
drilling points through the mounting holes
Step 5: Drill the holes and fix the base to the wall using the 2 screws
with countersunk heads supplied in the package.
Step 6: Mount the magnet near the marked side of reed switch.
Step 7: Insert the edge of the circuit board with the RF module into the
edge supports and press the other edge against the flexible retainer until it
snaps home with a click
Preparation for Use
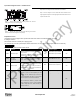
The Magnetic Contact is equipped with a 4-position DIP switch Each switch lever enables selecting 1 of 2 options.
B. Setting the Switches
Set the function switches as desired prior to applying power.
Use a ball point pen or another pointed object to shift the switch levers. The ON position is indicated by the arrow on the switch body .
Table 1. Getting acquainted with the function selector
Switch
Function
Selector
Selected Option
Default
SW1
Reed switch input
Determines whether the reed switch input will be
active or inactive
Note: With SW-1 set to OFF, the auxiliary input will
not initiate periodic supervision transmissions.
ON
Reed switch input is enabled
ON
Off
Reed switch input is disabled
SW2
Aux. input
type selector
Determines whether the auxiliary input will behave as
-of-line (E.O.L.) input or as a normally
closed (N.C.) input.
ON
OFF
OFF
Aux. input is N.C.
SW3
Restore reports
Determines whether the transmitter will report a
restore event when an input restores from an alarm
condition.
Selecting the ON position enables you to find out
whether the door or window under surveillance are
open or closed.
ON
Restore events reported
ON
OFF
Restore events not reported
SW4
Transmit Mode
In non-supervised systems, it is sometimes
required to report an alarm repeatedly at short
intervals, until the disturbed input reverts to its
normal (undisturbed) state. SW-4 is used to select
between repetitive and one-shot transmission.
Note: Transmissions initiated by “tamper” events
will be repeated once every 3 minutes, regardless
of SW-4 setting.When done, Install the battery as
directed in Para. 4.2.
ON
Reports alarms every 3 min.
OFF
OFF
Reports alarms only once
Preliminary