
User's Manual


Elpas Handheld LF Exciter – Configuration & User Guide
Page 3 of 8
V15/March 11
www.visonictech.com
HHLF Registration in EIRIS
Prior to configuration, each Handheld LF Exciter needs to be registered in the EIRIS database using the device’s Neuron ID Number in
order to make it possible for EIRIS to recognize the device. Ensure that the ID address assigned to each HHLF does not conflict with
the ID address of any other fixed or handheld LF exciters in the system.
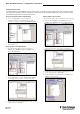
1. Start the EIRS Server; launch EV2 and access Setup mode.
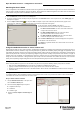
2. Access the Components tab in the Object Tab pane. Right-click on the All Readers branch of the component tree; Select Add By Type; the
Add Object box appears.
3. Select the Elpas LF Prox Reader
icon and press Add; a new Elpas LF prox reader sub-branch (with default name) appears in the
components tree. Additionally, the corresponding Elpas LF Prox Reader configuration form appears.
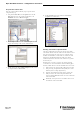
4. On the General tab, update the Name of the HHLF so
that it will stand for the device’s intended usage as described below:
• For Nurse Call Cancellation: The name of the HHLF matches the
caregiver that is issued the device.
• For Baby Tag/HHLF Match Tests: The name of the HHLF
represents the mother that is issued the devices.
• For Baby Tag/Mother Tag Match Tests: The name of the HHLF
matches the caregiver that is issued the device.
5. Enter the Neuron ID Number (the hexadecimal digits) that corresponds to
the ID address of the selected HHLF.
6. Press Apply; the registration details of the selected HHLF are saved to the
EIRIS database.
Using the Handheld LF Exciter to Cancel a Nurse Call
Elpas healthcare tags are often used as wireless, portable patient call-buttons in healthcare and assisted living environments. When a
patient/resident summons assistance using their assigned Elpas tag, EIRIS will immediately display and trigger the applicable visual
and audible call indicators as well as the relevant messaging options. EIRIS continues generating these call-indicators and messaging
options till the patient-call is closed by the responding caregiver using the HHLF remotely at the patient’s actual location. This type of
localized nurse call cancellation is accomplished by having the caregiver press the call-cancellation button on their assigned HHLF
during the time actual assistance is being rendered. Upon receipt of the call cancellation event, EIRIS will close the call, record the
identity of the responding caregiver and generate a time-stamp documenting the point-in-time assistance was provided.
Prerequisites
Before configuring EIRIS to support nurse call cancellation using the HHLF, verify that the following software prerequisites are satisfied:
• Make sure that the NurseCall.dll (Nurse Call extension) is installed in the EIRIS Extensions folder
(typically: C:\Eiris\e41srv\Data\Extensions) and that a proper license for the extension has been acquired.
• Register the needed Handheld LF Exciters in the EIRIS database. Ensure that the chosen Names of the HHLFs match the caregivers
that will use them.
Configuration Procedure
To configure EIRIS so that a Handheld LF Exciter can be used to cancel a nurse call, you will need to define a Nurse Call and HHLF
Cancellation alert as well as the subsequent Cancel Auto-Action.
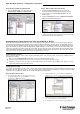
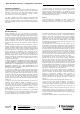
Step 1 - Define a Nurse Call Alert
1. Using the ButtonPressEX Alert, on the Inputs form
select the Button 1 Down option.
2. Select the following Input components options:
• All patient/resident tags
• All Readers
• All Status Types
3. Define the Clients, Outputs & Alert Messages as
required.