
User's Manual
Page 1 of 3
ETC03N01
Asset Tracking Tag
User Guide
Part Numbers : 5-ETC00433C, 5-ETC00433C-1, 5-ETC00433C-2, 5-ETC00433C-3
5-ETC00433C-4 & 5-ETC00433C-5
Elpas
ElpasElpas
Elpas
Active RFID/RTLS Solutions
Introduction
The Elpas Asset Tracking Tag from Visonic Technologies (VT) is a
miniature, unified active long-range Radio Frequency (RFID) and
Infrared device designed for the real-time tracking of mobile assets or
people.
The tag’s all-in-one, dual technology transmitter continuously emits
low power, supervisory beacon type radio frequency (RF) messages
as well as safe, supplemental infra-red (IR) messages that identifies
the exact real-time location of assets or people with unparallel reliability
and precision. When attached to an asset; the tag automatically
transmits alert notifications for keeping personnel informed of
deliberate or accidental tampering and/or removal.
The tag’s onboard magnetic low frequency (LF) Receiver adds
chokepoint area detection so whenever the protected asset or person
physically nears an exit/entrance covered by an Elpas LF Exciter an
alarm notification is generated.
The Asset Tracking Tag also features an optional one-touch wireless
emergency call or duress alert functionality to ensure complete 24/7
personnel safety and supervision
Made of tough ABS thermoplastic, the Asset Tracking Tag withstands
severe physical shocks and drops, is water resistant and temperature
stable. Small in size and weight, the tag is easily affixed to an asset
using the *Equipment Clip worn as a necklace when attached to the
Pendent Clip with Lanyard or belt worn when used with the Belt Clip.
Specifications
Transmission Duration: Approximately 2ms
IR Supervision (Motion/Stationary): Every 5 sec/60 sec
RF Supervision (Motion/Stationary): Every 10 sec/60 sec
RF Upon Entry into LF Area: Burst of 4 RF transmissions
0.5seconds apart.
LF Sampling (Motion/Stationary): Every 500ms/15 secs
RF under LF Rate: 2 secs; after 10 mins returns to 10 secs
IR under LF Rate: 10 seconds
LF Timeout: Transmits 2 non-LF messages after not hearing
from LF for this amount of time
Time to Idle: 10 seconds
Events:
Button Press/Release
Tamper & LF
Low Voltage
Moition/Stationary
4 IR/RF transmissions (each @ 2ms
in duration), 400ms apart.
Visual Indicators: Green LED indicates tranmission.
Red LED indicates button press.
Badge ID: Unique factory programmed ID
Dimensions: 34x40x15 mm (1.3 x 1.6 x 0.6 inches)
Power Source: One 3V lithium battery, CR 2430
Battery Life:
Triple Tech: In motion 8 hrs/day, 6 days/week - 15 Months
Dual Tech: In motion 8 hrs/day, 6 days a week - 3.5 Years
Dual Tech: In motion 1 hr,/day 6 days/week - 7 years
Weight (assembled): 20 grams (0.75 ounces)
Operating Temperature: 10°C to 70°C (14°F to 159°F)
Construction: Clear polymer plastic
Housing: IP64 water rated enclosure
Compliance Standards: EN 300 220-3, EN301 489-03,
EN50130-4:95+A1(98) +A2(03), EN60950-1:01,EN 60601-1/2
FCC Part 15.231 Level C, FCC ID#: GSA-ETC00433 (433.92 MHz
Warranty: One year limited warranty (excluding battery)
Installation Instructions
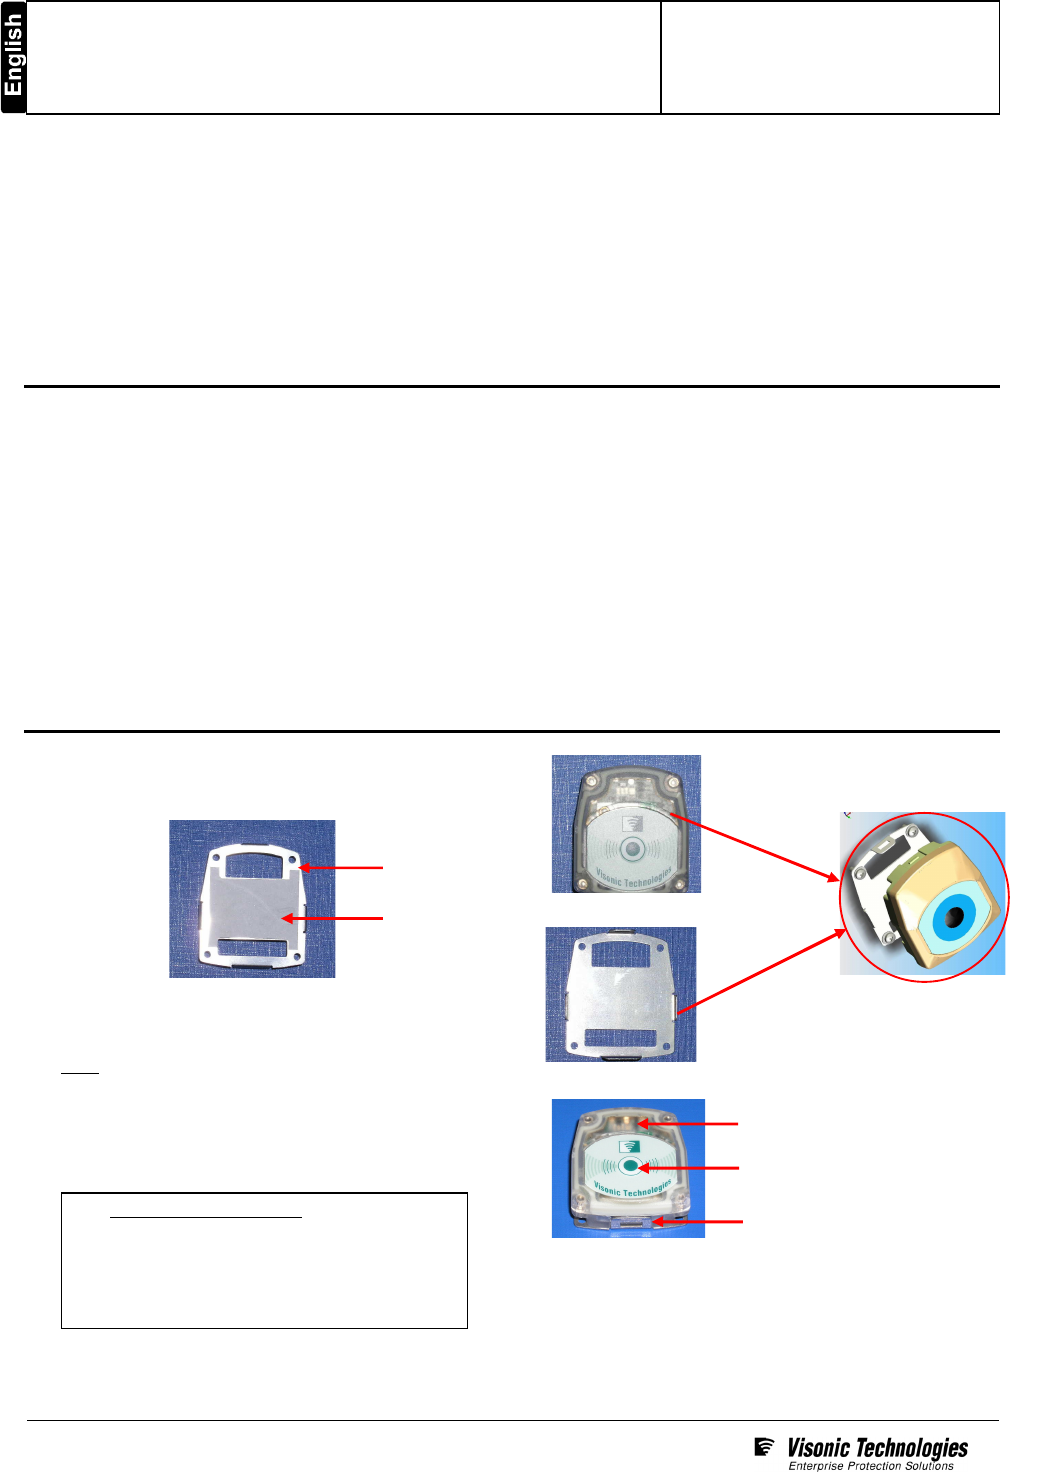
1. Remove the protective layer from the double-sided adhesive on
the back of the mounting bracket (Figure 1).
Figure 1:Front View - Mounting Bracket
2. Carefully position the mounting bracket on the asset to be tagged
(narrow side on top, wider side at the bottom).
Note: It is recommended to place the tag on light colored
surfaces. Dark surfaces may require the addition of a white
sticker placed between the surface and the tag.
3. Place the tag in the mounting bracket and click it into place such
that the wide/narrow sides correspond to the shape of mounting
bracket (Figures 2, 3 , 4 and 5).
4. To remove the tag from the mounting bracket, use a small
flat-head screwdriver to release the clip that holds the tag in place
(Figure 5).
5. To reattach the tag, repeat steps 3 and 4.
Double-sided
Adhesive
Mounting Bracket
Figure 3: Front View Mounting Bracket
Figure 2: Front view
Figure 5:
Tag (in
mounting bracket
)
Red / Green LEDs
(button press / transmission)
Tag Mounting Bracket (clip)
Tag Button
Figure 4: Attaching Tag
to Mounting Bracket
Tags on Laptop Computers
The tag should be positioned on the top right corner
of the latop lid. If the tag is attached towards the
center of the lid, the RF performance will be
significantly degraded, reducing the detection rangeof
the tag.