
User Guide


2-30 IntelliTouch/SecureTouch Guide
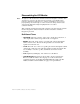
Reconnect all cables that were removed during the disassembly procedure.
Watch for single ground connections from the CRT mount to the chassis,
between individual chassis members, etc., which may have lugs and screws to
connect them, or sometimes individual push-on solderless connectors. Failure
to reconnect these important cables may result in improper performance of the
display after reassembly and may render the unit unsafe.
Re-glue the CRT circuit board to the connector with an electronic-grade
(non-corrosive) silicone adhesive (such as GE RTV-162). Discharge the CRT
again (see Discharging the CRT, page 12), and then reconnect the anode lead to
the anode button, making sure the spring hooks catch inside the hole.
If practical, test the monitor and touchscreen at the earliest time possible before
reassembling the display, as the reassembly of the back case can be tedious. If
mistakes have been made, corrections are easier to make if the covers are still
off.
Next, label the monitor with information about the touchscreen installed, along
with the model and settings of any internal serial controller.
For example:
Contains -2500S Serial Controller
Settings: 9600/8/1/N SmartSet/Binary/Stream Mode
Finally, remove any agency certifications (UL/cUL, FCC, TÜV, CE, etc.) for
which you have not resubmitted.
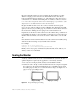
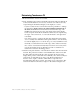
Sealing the Monitor
A variety of methods may be used to seal an IntelliTouch system from dust or
splashed liquids as required by the application or an industry standard:
1 Use only closed cell polyolefin (Volara) foam available from Elo.
2 Adhere the seal to the lip of the bezel. When the bezel is compressed against
the touchscreen, the Volara material will act as a seal. Make sure the bezel
and sealing tape (Volara) do not touch the reflector strips. See Figure 2.8 on
page 31 for proper sealing location.
Figure 2.7
Proper and Improper Sealing
Proper Sealing
Improper Sealing