AUTO-SCANNING WITH DIGITAL CONTROL LCD COLOR MEDICAL MONITOR AMM15TK2/AMM15TK2-TE/AMM15TK2-TEW Operation Manual For future reference, record the serial number of your display monitor in the space below: SERIAL number The serial number is located on the back of the monitor
WARNING The title “WARNING” is used to inform the users of possible causes that could inflict the injury, death, or property damage to the patients. CAUTION The title “CAUTION” is used to inform the users of possible causes that could inflict the patients although it might not severe enough to cause deaths.
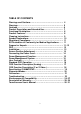
TABLE OF CONTENTS Warnings and Cautions…………………………………………… 4 Warnings…………………………………………………………….. 5 Cautions……………………………………………………………… 6 Product Description and Intended Use…….………………….. 7 Functional Description……………………………………………. 8 Product Features…………………………………………………… 8 Cleaning instructions……………………………………………… 9 Symbol Explanations……………………………………………… 10 Regulatory Compliance…………………………………………… 11 EU Declaration of Conformity for Medical Applications…….
Warnings and Cautions Please read this manual and follow its instructions carefully. The words warning, caution, and note carry special meanings and should be carefully reviewed: Warranty is void if any of these warnings are disregarded. ADVAN Int’l Corp accepts full responsibility for the effects on safety, reliability, and performance of the equipment only if: • Re-adjustments, modifications, and/or repairs are carried out exclusively by ADVAN Int’l Corp.
Warnings 1. Read the operating manual thoroughly and be familiar with its contents prior to using this equipment. 2. Carefully unpack the unit and check if any damage occurred during shipment. 3. Should any solid object or liquid fall into the panel, unplug the unit and have it checked by qualified personnel before operating it any further. 4. Unplug the unit if it is not to be used for an extended period of time. To disconnect the cord, pull it out by the plug. Never pull the cord itself. 5.
Cautions 1. The AC Adapter must be plugged into a Grounded power outlet. 2. Use only the proprietary AMM15TK2 power supply for the AMM15TK2 monitor. Make a proper connection by ensuring that the shrink tubing completely secures the connection between the DC power cord and the extension cord. 3. Turn power off when unit is not in use. 4. Never operate the unit right after having transported from a cold location directly to a warm location. 5.
Product Description and Intended Use The AMM15TK2 Series Medical Monitor is an intelligent, microprocessor-based TFT-LCD monitor intended for use in medical applications. It has an ergonomically designed display and is compatible with most analog RGB (Red, Green, Blue) display standards. Advan AMM15TK2 Series Medical Monitor consists of a low-profile molded plastic monitor head, video and a power supply.
Functional Description and Product Features • Display Type Color Active Matrix LCD • Control Buttons: -OSD menu display: Menu Button -Adjustment increase -Power on/off and Adjustment decrease and -Auto adjust & exit OSD menu: Auto Button • Adjust brightness/contrast directly with the adjustment increase/decrease buttons.
Cleaning Instructions Advan AMM15TK2 Series Monitors will continue to operate normally while being cleaned in a fashion normal for a hospital environment. This includes cleaning with a damp (wrung out), mild soapy cloth. Protection from various chemicals used for cleaning. Advan AMM15TK2 Series Monitors will withstand non-abrasive cloths and cleaning solutions used in hospitals for like equipment. This is typically warm water and mild detergent for all surfaces or 70% IPA for the touchscreen surface.
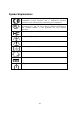
Symbol Explanations Indicates proof of conformity to applicable European Economic Community Council directives and to harmonized standards published in the official journal of the European Communities Tested and certified by UL to UL60601-1. If this mark appears with the indicators "C" and "US" the product is certified for both the U.S and Canadian markets, to the applicable U.S and Canadian standards. Tested to comply with FCC Class B standards. Dangerous high voltage. Consult accompanying documents.
Regulatory Compliance This monitor has been tested to comply with IEC/EN 60601-1 and IEC/EN60601-1-2 Certified by UL to medical standard UL60601-1(UL/cUL Mark). Because many medical offices are located in residential areas, this monitor, in addition to the medical requirements, has also been tested and found to comply with the limits for FCC Class B computing devices in a typically configured system.
Please check if the following items are present when you unpack the box, and save the packing materials in case you will need to ship or transport the monitor in future. ·AMM15TK2 Series Medical Monitor, VGA cable, S-Video cable, BNC cable and BNC to RCA adapter. ·AC power cord and AC-Adapter CAUTION Manufacturer : Ault Inc. Model No : MW160KA1203F54 ·User Manual.
DDC To make your installation easier, the monitor is able to Plug and Play with your system if your system also supports DDC protocol. The DDC(Display Data Channel)is a communication protocol through which the monitor automatically informs the host system about its capabilities, for example, supported resolution and corresponding timing. The monitor supports DDC1 and DDC2B standard. Installation To install the monitor to your host system, please follow the steps as given below: Steps 1.
Screen Position Adjustment (with optional stand) In order to optimize the best viewing position, you can adjust the tilt of the monitor by using both of your hands to hold the edges of the monitor as shown in the figure below. The monitor can be adjusted up to 30 degrees as indicated by arrow below. Connecting the Power Cord • Check first to make sure that the power cord you use is the correct type required for your area.
Power Management Function The monitor is equipped with the power management function which automatically reduce the power consumption when not in use in three power level modes. • Stand-by Mode The monitor goes into stand-by mode when the horizontal sync signal is off for about 10 seconds. In this mode, the screen goes off and the power LED blinks for 1 seconds On and 1 second Off. The screen is displayed after the horizontal sync signal is restored.
User Controls Front Panel Controls 1. Power LED : Lights up to indicate the power is turned ON. 2. Power Switch : To turn ON or OFF the power. 3. + : To increase the value of the parameter in the OSD you have selected for adjustment. : To increase the contrast directly when OSD menu is not activated. : To move upward in the OSD menu. : Execute a function of selected item. 4. - : To decrease the value of the parameter in the OSD you have selected for adjustment.
OSD Function Description Under Analog RGB Display Item Function Brightness Contrast Frequency Phase Vertical. Horizontal OSD Hor Pos OSD Ver Pos OSD Background User Timeout Color Temp To increase or decrease the brightness. To increase or decrease the contrast. To adjust frequency (dot clock). To adjust phase (clock-phase). To move the screen upward or downward To move the screen left or right. To move OSD menu left or right. To move OSD menu upward or downward. Choose between Opaque and Translucent.
Under Composite or Super Video Display Item Function Hue Saturation Brightness Contrast Frequency Phase Vertical. Horizontal OSD Hor Pos OSD Ver Pos OSD Background User Timeout Color Temp To increase or decrease the hue level. To increase or decrease the saturation level. To increase or decrease the brightness. To increase or decrease the contrast. To adjust frequency (dot clock). To adjust phase (clock-phase). To move the screen upward or downward To move the screen left or right.
Specification Of AMM15TK2 AMM 15TK2 Input Signal Scanning Frequency Display Size Brightness, Contrast Ratio Gray Scales Signal Input Connector Environment LCD Panel Type Resolution Display Color Response Time Color Tone Color Filter Face Finishing Viewing Angle(L/R/T/B) Video Sync Input Impedance Horizontal Vertical HxV Brightness 15" Color TFT Panel Active Matrix 1024 ×768 @ 75Hz Max.
Supported Modes Mode 1 4 6 7 8 9 11 12 13 14 16 17 18 19 20 Resolution(H ×V) 640 ×350 720 ×400 640 ×480 640 ×480 640 ×480 640 ×480 800 ×600 800 ×600 800 ×600 800 ×600 832 ×624 1024 ×768 1024 ×768 1024 ×768 1024 ×768 H. Freq.(KHz) 31.5 31.5 31.5 35.0 37.9 37.5 35.1 37.9 48.1 46.9 49.7 48.8 48.4 56.5 60 20 V. Freq.
Connectors DC Input Connector Jack Power Input The SCD-014-1-A (SHIUA CHYUAN)or equivalent. Pin Description 1 +12V DC 2 GND Video Input 15 pin D-subminiature connector. The vendor P/N is DHSB-15 FRF7(LEOCO) or equivalent. Description Red Video Green Video Blue Video NC Logic Ground Red Video Ground Green Video Ground Blue Video Ground Pin 1 2 3 4 5 6 7 8 Pin 9 10 11 12 13 14 15 Description NC VGA CON NC SDA (DDC1/2) H- sync V-sync SCL (DDC2B) Touch Port 9Pin D-subminiature connector.
Troubleshooting Before sending your LCD monitor for servicing, please check the troubleshooting list below to see if you can self-diagnose the problem. Problem Current Status No Picture LED ON LED OFF LED Blinking Abnormal · Picture Unstable Picture Display is missing, center shift, or too small or too large in display size Remedy ·Using OSD, adjust brightness and contrast to maximum or reset to their default setting. ·Check the power switch.
This monitor is intended for use in Health Care Facilities model AMM15TK2 Equipment is not suitable for use in the presence of flammable anesthetic mixture with air or with oxygen or nitrous oxide. No user serviceable parts inside, ask qualified personnel when accessing inside. For disposal of waste product, follow the requirement of local code. Electrical input rating: 12V DC 3.5A Classification Type of protection against electric shock: Class I Equipment.
Description of Warranty Advan warrants that the goods the goods sold hereunder will be free of defects in materials and workmanship, and such goods will substantially conform to the specifications furnished by Advan, and to any drawings or specifications furnished to Advan by the Buyer if approved by Advan. This warranty shall be effective only if Advan receives notice of such defect or nonconformance during the period of the warranty.
ADVAN DISCLAIMS ALL OTHER WARRANTIES EXPRESS OR IMPLIED INCLUDING, WITHOUT LIMITATION, ANY IMPLIED WARRANTIES OF MERCHANTABILITY OR FI TNESS FOR PARTICULAR PURPOSE, EXCEPT TO THE EXTENT THAT ANY WARRAN TIES IMPLIED BY LAW CANNOT BE VALIDLY WAIVED. No oral or written information or advice given by ADVAN, its authorized service center, distrib utors, dealers, agents or employees, shall create another warranty or modify this warranty.
Tounchscreen User’s Manual (AMM15TK2-TE or AMM15TK2-TEW) Quick Start 1.Connect Power Code and VGA Cable of LCD Monitor. 2.Connect Touchscreen DB9 male RS-232 cable. 3.Turn the LCD display Power ON. 4.Adjust the tilt of LCD Monitor. 5.Adjust the Picture of LCD Monitor. 6.Install driver software of Touchscreen (See “Driver software” for details). 7.Adjust the calibration of Touchscreen (See “Driver software” for details).
4. Insert the Windows or Windows NT driver disk into diver A or B. 5. Browse for “setup.exe” in the directory to which you extracted the driver files. 6. Type “setup.exe” in the space provided and press Enter. 7. The touchscreen setup wizard will appear. You will need to select serial port, type of touchscreen controller, and language. 8. Complete the setup program. 9. Shutdown and restart windows NT. 10. Click the start button, then click control panel. 11. Double-click touchscreen control panel. 12.
ADVAN INTERNATIONAL CORPORATION 47456 Fremont Blvd. Fremont,CA 94538 Tel : 510-490-1005 Fax : 510-490-1151 Web Page : http://www.advancorp.