ET2639L 26” LCD Touchmonitor User Guide
Elo TouchSystems ET2639L 26” LCD Touchmonitor User Guide Revision E SW600286 Elo TouchSystems 1-800-ELOTOUCH www.elotouch.
Copyright © 2008 Tyco Electronics. All Rights Reserved. No part of this publication may be reproduced, transmitted, transcribed, stored in a retrieval system, or translated into any language or computer language, in any form or by any means, including, but not limited to, electronic, magnetic, optical, chemical, manual, or otherwise without prior written permission of Elo TouchSystems. Disclaimer The information in this document is subject to change without notice.
Table of Contents Chapter 1: Introduction ...................................................................................... 5 About the Product ............................................................................................................. 5 Chapter 2: Installation And Setup ..................................................................... 6 Unpacking Your Touchmonitor ......................................................................................... 7 Interface Connection ...
C H A P T E R 1 INTRODUCTION About the Product Your new ET2639L Elo TouchSystems Touchmonitor combines the reliable performance of touch technology with the latest advances in Liquid Crystal Display (LCD) design. The monitor comes with the following features: • 26” color active matrix thin-film-transistor (TFT) with a native resolution of 1366 X 768. • Available in Acoustic Pulse Recognition (APR), IntelliTouch, SecureTouch, and Surface Capacitive touch technologies.
C H A P T E R 2 INSTALLATION AND SETUP This chapter discusses how to install and set up your LCD touchmonitor and how to install Elo TouchSystems driver software.
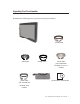
Unpacking Your Touchmonitor Check that the following items are present and in good condition: Power cable Touchmonitor USB Cable Analog Video DVI-D cable (not included with ET2639L-xxxx-x-A-x models) Serial Cable (not included with ET2639L-Axxx models) OSD Control Box CD and Quick Install Guide Elo TouchSystems ET2639L User Guide 7
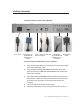
Interface Connection Connector Panel on Rear side of Monitor Power Cable Serial Cable (not included with ET2639L-Axxx models) Power OSD box USB cable DVI-D cable Analog Video Button connector (not included with Cable ET2639L-xxxx-xA-x models) To connect your touchmonitor to your computer: 1 2 3 4 5 Connect the power cable to the rear panel of the monitor and the other end to the power outlet. Connect either the USB cable OR the serial cable to the rear panel of the monitor. Note: Do not use both.
Installing the Touch Driver Your Elo touchmonitor is Plug-and-Play compliant. Information on the video capabilities of the touchmonitor is sent to the video display adapter when Windows starts. If Windows detects the touchmonitor, follow the instructions on the screen to install a generic Plug-and-Play monitor. Elo TouchSystems provides touch driver software that allows your touchmonitor to work with your computer.
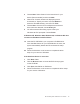
2 Choose Next. Select “Search for the best driver for your device (Recommended)” and choose Next. 3 When a list of search locations is displayed, place a checkmark on “Specify a location” and use Browse to select the \EloUSB directory on the Elo CD-ROM. Choose Next. Once the Elo TouchSystems touchscreen driver has been detected, choose Next again. You will see several files being copied. Insert your Windows 98 CD if prompted. Choose Finish.
Monitor Mounting Orientation When the monitor is mounted in the landscape orientation, the cable connection panel must be at the bottom, as shown in the illustration below. Rear View of Monitor—Landscape Orientation Cable connection panel must be at the bottom for proper mounting of the monitor. Alternatively, the monitor may be mounted in the portrait orientation. For this orientation, the cable connection panel may be on either side, as shown in the illustrations below.
Landscape Mounting Orientation Angle Views The mounting orientation can be up to a 90° angle from vertical, as shown in the illustrations below.
Portrait Monitor Orientation Angle Views The mounting orientation can be up to a 90° angle, as shown in the illustration below.
C H A P T E R 3 OPERATION About Touchmonitor Adjustments Your touchmonitor will probably not require adjustment. However, variations in video output and application may require adjustments to your touchmonitor to optimize the quality of the display. For best performance, your video source should be at 1360 x 768 resolution, at 60Hz vertical frame rate. Operating in other resolutions will degrade video performance.
On-Screen Display (OSD) Control Box OSD Control Buttons The On-Screen Display (OSD) Control Box, included with your shipment, allows you to change settings on the monitor screen.
OSD Lock/Unlock You are able to lock and unlock the OSD feature. When the OSD is locked, no OSD can be displayed or used. The monitor is shipped in the unlocked position. To lock the OSD: 1 Press the MENU button and UP button simultaneously for 2 seconds. A window will appear displaying “OSD Unlock.” 2 Continue to hold the buttons down for another 2 seconds and the window toggles to “OSD Lock.” Power Lock/Unlock You are able to lock/unlock the Power feature.
OSD Control Options Auto Adjust • Automatically adjusts video timing parameters (of VGA video only). Luminance Brightness • Adjusts the brightness. Contrast • Adjusts the contrast. Geometry (VGA only) H-position • Moves the image left or right on the screen. V-position • Moves the image up or down on the screen. Clock • Stretches the image horizontally. Phase • Adjusts the phase of the dot clock to image data. Color • Sets the color temperature.
Recall Recall Color • Restores default color temperature settings. Recall Defaults • Restores original factory settings for H-position, V-position, Clock, and Phase for the current video mode (VGA only). • Restores original factory settings for all other parameters and video inputs, except language (VGA and DVI). Miscellaneous Sharpness • Adjusts sharpness of video. Display Information • Frequency of the input horizontal/vertical synchronizing signal is indicated.
Preset Display Modes The monitor comes with preset settings for commonly used video modes. It will automatically adjust the picture size and centering for any of the video modes listed in Appendix B, ET2639L Specifications table, under “Preset Display Modes.” If you make any adjustments to the H-position, V-Position, Clock and Phase video settings via the OSD in a preset display mode, those changes will be automatically saved for that display mode and recalled for any future use of that display mode.
C H A P T E R 4 TROUBLESHOOTING If you are experiencing trouble with your touchmonitor, refer to the following table. If the problem persists, please contact your local dealer or our service center. Elo Technical Support numbers are listed on page 33. Solutions to Common Problems Problem Suggestion(s) The monitor does not respond after you turn on the system Check that the monitor’s Power Switch is on. Turn off the power and check the monitor’s power cord and signal cable for proper connection.
APPENDIX A TOUCHMONITOR SAFETY This manual contains information that is important for the proper setup and maintenance of your touchmonitor. Before setting up and powering on your new touchmonitor, read through this manual, especially Chapter 2 (Installation and Setup), and Chapter 3 (Operation). 1 To reduce the risk of electric shock, follow all safety notices and never open the touchmonitor case. 2 Turn off the product before cleaning. (Please refer to page 22 for proper cleaning methods.
Care and Handling of Your Touchmonitor The following tips will help keep your Elo touchmonitor functioning at the optimal level. • To avoid risk of electric shock, do not disassemble the touchmonitor. The unit is not user serviceable. Remember to unplug the touchmonitor from the power outlet before cleaning. • Do not use alcohol (methyl, ethyl or isopropyl) or any strong dissolvent. Do not use thinner or benzene, abrasive cleaners or compressed air.
APPENDIX B TECHNICAL SPECIFICATIONS Elo TouchSystems ET2639L User Guide 23
ET2639L Specifications Model ET2639L LCD Display Display Size Pixel Pitch Preset Display Modes (require no user adjustments of image) 26” TFT Active Matrix Panel 575.769(H) x 323.712(V) mm .4215(H) x .
Plug & Play Touch Technology (optional) Power Input Operating Conditions Storage Conditions Dimensions (HxWxD) Weight (Unpackaged) DDC1 and DDC2B IntelliTouch, Surface Capacitive, or Acoustic Pulse Recognition 100–240Vac, 50/60Hz, 2.5A Temp: 0°C to 40°C Humidity: 20% to 80% (No Condensation) Altitude: 0 to 3,658 m Temp: -20°C to 60°C Humidity: 10% to 90% (No Condensation) Altitude: 0 to 12,192 m 650 x 397 x 98 mm 14.
ET2639L 26” LCD Touchmonitor Dimensions Note: Detailed mechanical files can be found at: www.elotouch.
REGULATORY INFORMATION I. Electrical Safety Information: A) Compliance is required with respect to the voltage, frequency, and current requirements indicated on the manufacturer’s label. Connection to a different power source than those specified herein will likely result in improper operation, damage to the equipment, invalidation of warranty, or a fire hazard if the requirements are not followed. B) There are no operator serviceable parts inside this equipment.
B) Notice to Users in Canada: This equipment complies with the Class A limits for radio noise emissions from digital apparatus as established by the Radio Interference Regulations of Industry Canada. C) Notice to Users in the European Union: Use only the provided power cords and interconnecting cabling provided with the equipment.
2) If this equipment appears to cause interference with radio or television reception, or any other device: a) Verify as an emission source by turning the equipment off and on. b) If you determine that this equipment is causing the interference, try to correct the interference by using one or more of the following measures: i) Move the digital device away from the affected receiver. ii) Re-position (turn) the digital device with respect to the affected receiver.
III. Safety Label This device is not intended for use at visual display workplaces in compliance with BildscharbV.
WARRANTY Except as otherwise stated herein or in an order acknowledgment delivered to Buyer, Seller warrants to Buyer that the Product shall be free of defects in materials and workmanship. With the exception of the negotiated warranty periods; the warranty for the touchmonitor and components of the product is 3 years. Seller makes no warranty regarding the model life of components. Seller’s suppliers may at any time and from time to time make changes in the components delivered as Products or components.
Product less depreciation calculated on a straight-line basis over Seller’s stated Warranty Period. THESE REMEDIES SHALL BE THE BUYER’S EXCLUSIVE REMEDIES FOR BREACH OF WARRANTY. EXCEPT FOR THE EXPRESS WARRANTY SET FORTH ABOVE, SELLER GRANTS NO OTHER WARRANTIES, EXPRESS OR IMPLIED BY STATUTE OR OTHERWISE, REGARDING THE PRODUCTS, THEIR FITNESS FOR ANY PURPOSE, THEIR QUALITY, THEIR MERCHANTABILITY, THEIR NONINFRINGEMENT, OR OTHERWISE.
Check out Elo’s Website! www.elotouch.com Get the latest... • Product information • Specifications • News on upcoming events • Press release • Software drivers • Touch Monitor Newsletter Getting in Touch with Elo To find out more about Elo’s extensive range of touch solutions, visit our Website at www.elotouch.