
Installation Guide Instruction Manual


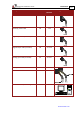
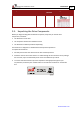
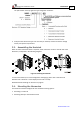
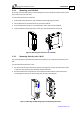

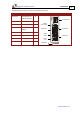
Table Of Contents
- Chapter 1: Safety Information
- Chapter 2: Introduction
- Chapter 3: Installation
- 3.1. Before You Begin
- 3.2. Unpacking the Drive Components
- 3.3. Assembling the Heatsink
- 3.4. Mounting the Harmonica
- 3.5. Connecting the Cables
- 3.5.1. Wiring the Harmonica
- 3.5.2. Connecting the Power Cables (J8)
- 3.5.3. Special Note about Disconnecting Molex Connectors
- 3.5.4. Connecting the Auxiliary Power Cable (J4)
- 3.5.5. Connecting the Feedback and Control Cables
- 3.5.5.1. Main Feedback (Feedback A) Cable (Port J3)
- 3.5.5.2. Communication Cable (Port J1)
- 3.5.5.3. I/O Cables
- 3.5.5.4. Auxiliary Feedback (Port J2)
- 3.5.5.4.a Auxiliary Feedback: Main Encoder Buffered Output or Emulated Encoder Output Option (Port J2)
- 3.5.5.4.b Auxiliary Feedback: Differential Encoder Input Option (Port J2)
- 3.5.5.4.c Auxiliary Feedback: Single-Ended Encoder Input Option (Port J2)
- 3.5.5.4.d Auxiliary Feedback: Pulse-and-Direction Input Option (Port J2)
- 3.6. Powering Up
- 3.7. Initializing the System
- Chapter 4: Technical Specifications
- 4.1. Features
- 4.2. Harmonica Dimensions
- 4.3. Power Ratings
- 4.4. Environmental Conditions
- 4.5. Harmonica Connectors
- 4.6. Auxiliary Power Supply (J4)
- 4.7. Control Specifications
- 4.8. Feedback
- 4.9. I/Os
- 4.10. Communications
- 4.11. Pulse-Width Modulation (PWM)
- 4.12. Heatsink Specifications
- 4.13. Compliance with Standards

Harmonica Installation Guide Installation
MAN-HARIG (Ver. 1.902)
www.elmomc.com
18
3.4.1. Mounting on a DIN Rail
At the top rear of the Harmonica, a horizontal groove lets you quickly and easily snap the drive
onto a DIN rail in your work area.
To mount the Harmonica on a DIN rail:
1. At the back of the Harmonica, push the bottom mounting strip down fully.
2. Tilt the Harmonica back towards the top part of the DIN rail.
3. Press the Harmonica down to a vertical position until it clicks onto the DIN rail.
4. Push the bottom mounting strip one notch up to lock the Harmonica on the rail.
HAR_DIN_Rail_1
Figure 4: Mounting the Harmonica on a DIN Rail
3.4.2. Mounting Directly onto a Wall
The mounting strips at the back of the Harmonica enable you to screw the drive directly into a
wall.
To mount the Harmonica onto a wall:
1. On the back of the drive, fully extend the top mounting strip so that the end with the holes
is exposed. (The bottom strip is delivered already extended.)
2. Mount the Harmonica vertically onto the wall with two M3 or M3.5 round head screws,
one through the top hole of the mounting strip and one at the bottom.
Figure 5: Extending the Mounting Strips and Attaching the Screws