
Programming instructions


26
26
G L A S S 1 0 1
Glass fusing is simply the process of stacking two or more layers of compatible glass together to make a
design. The stacked glass is placed in the super heated environment of a kiln where it melts together.
THE FUSING PROCESS
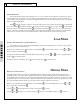
There are two basic fusing stages; heating and cooling. During the heating process the fusible glass
is slowly taken from room temperature up to 1300 – 1500 °F, depending upon the finished “look” we
desire. When the glass is in this temperature range you can stop the fusing process at any time. This is
when you will make the decisions that make your work unique. It’s your opportunity to be the artist.
• At 1300 °F the project will have slightly rounded, polished edges and a textured surface.
• At 1500 °F the top layer of glass will sink down into the bottom layer. The project will have a
smooth surface and rounded edges.
During the cooling process we control the rate at which the glass cools and slowly bring it back to room
temperature. The length of time that this takes is determined by the size of the project and the number
of layers being fused. The larger the project and the greater the number of layers the longer this will
take. Don’t rush this step it is critical to the success of your work! While the glass is cooling, it is going
through an annealing phase, which occurs at approximately 960 °F. I like to call it the “healing” phase.
Keep in mind that you have just taken several layers of glass and forced them to become one. They
need some time to adjust. Be nice to your glass!
MATERIALS / COMPATIBILITY
Glass expands when it is heated and contracts when it cools. When we fuse, we work within a family of
products that have been “tested compatible” to have the same C.O.E (Coefficient of Expansion). These
materials are specially formulated and pretested by the manufacturer for consistency. Don’t bother
wasting your time working with the stuff you have laying around the garage. If it isn’t marked tested
compatible it isn’t! Invest in fusible glass right up front; the success of your project depends on it. This is
the best advice you will get today!
Tips for better projects:
• Cutting the glass: Take the time to cut the glass accurately. Grind the project pieces where
necessary to improve the fit.
• Clean: Wash the glass before assembling the project with a mild detergent and water. Dry the
glass thoroughly.
• Pattern Design: Construct your projects with 2 – 2 ½ layers of glass for greater consistency in
size, shape and thickness. Layer 1 is the base. Layer 2 is the design layer and the third “half”
layer is the accent.
• Glue: Lightly tack the design layer to the base layer so you can transport the project to the kiln
without its shifting. Use a tooth pick or similar tool to apply a pin head or smaller size dab of
Elmer’s white glue to the back side of the glass.
• Firing Speed: Slower is usually better. If you are not sure which firing program to use, err on
the side of conservative and choose the slower program.
The Basics
GLASS 101
By Lisa Vogt