
Installation Guide


ellasbubbles.com
1. Check to see that the tub/pan is level from front to back and left to right. The maximum
tolerance
for level is +/- ¼”. Also note that a gap of 1/8” is the maximum tolerance on marble seams.
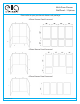
2. Accurately measure tub spout and handle(s} hole location on alcove side wall from the front edge of
the bathtub and transfer dimensions to one of the side panels. You may want to make a template (use
shipping carton} to check hole layout before you cut holes into side panel. After you have double checked
your measurements, using the proper size drill or hole saw, cut out holes for outlets ..
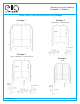
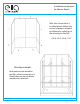
3. Place the Center Panels against back wall, raised from edge on bathtub rim covering the flange. Align
center lines, using masking tape - temporarily tape center panel in place. Position drilled side panel over
tub spout and handle(s), be sure to align front edge with front edge of bathtub, temporarily tape in place.
Temporarily tape remaining side panels in place, align front edge of side panel with front edge of base/
tub. These will be your reference lines for permanently installing panels. Remove panels.
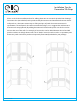
4. Apply a 1 /8" dia. bead of adhesive to the back side of one of the Center Panels using a random"zig-zag"
pattern. Carefully position panel on the back wall of alcove, align previously marked centerlines and top
edge guide lines. Press panel in place, working from top edge to bottom. "Vent" panel following
procedure
described on adhesive cartridge before proceeding to install drilled side panel next, be sure to
align front and top edge guide line. Follow the same procedure for the remaining center and side walls
starting from the center bottom panels, then side bottom panels, and finally repeating that for the top
row of panels.
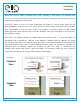
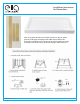
5. After all the walls have been installed; it is best to brace the walls with 1x4 or 1x2 scrap, being careful
not to put too much pressure on the panels, as they are fragile. Use a small block of wood on the ends of
each side of your brace to help distribute the pressure. Note: Additional bracing may be required.
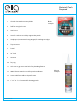
Installation Instructions
for Shower Panels
Venting Method