
Installation Guide


ellasbubbles.com
IMPORTANT: If grab bars are to be installed, blocking should be installed behind the substrate
before attempting to install the grab bars on the panels. The holes for the grab bars should be pre-
drilled in the same area of the blocking prior to installing the grab bars.
Failure to do this will cause the grab bars to come loose and could cause breakage or cracking of the
panels. This type of breakage is not covered by Ella's Bubbles warranty.
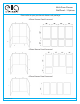
IMPORTANT: These panels are manufactured with full blocks of tile at the top and bottom of the panels.
In order to keep the grout lines level; it will be necessary to trim the bottom of the panel if the tub/
pan is out of level. All other cuts will be made on the top of the panel, to adjust the height of the panels.
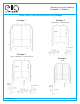
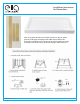
IMPORTANT: To get the best possible look with these panels, it is important to align the grout lines.
The best way to accomplish this is after the back panel has been installed and the overall measurements
of the side panels have been taken, measure from the tub or shower base up to a grout line at eye
level on the back panel. Before you cut the height of the side panels, measure from the same spot on
the side panels and, if needed, you can cut a little off the top and bottom of the side panels to help align
the grout lines. If you have any questions about this procedure, please call customer service at
1
(800)480-6850(US).
Installation
Guidelines
The wall panels may be installed over d
rywall, plaster, painted walls, plywood, or any solid Wall, stud
or existing tile surface. Wall surfaces must be clean, dry and free grease, dust and loose or flaky paint
or plaster. Additional bracing to the support optional grab bars and/or seat should be installed at this
time. Refer to the accessory manufacturer instructions for proper installation according to local
building codes. Plan rough plumbing requirements (drain- venting- supply lines) at this time
acco rding to local building code. Turn of water supply to bathtub, remove existing control valve
handle(s) cover plates and filler spout.
Prepare walls, floor and base.
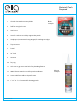
Confirm that all components have been included before beginning your installation. Floor leveling
compound should be use under the shower base if your floor is not perfectly level. Do not screw or
bolt the base to the floor.
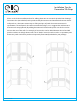
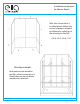
INSTALLERS NOTE: You will need to start the top of all of the panels at the exact same place so that the
“grout joints” will meet in the corners.
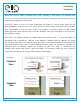
IMPORTANT: If installing the new Ella's Bubbles panel system over existing tile, make sure the walls
(substrate and framing) are in good shape (no water damage, mold or mildew) and the existing
tiles are not badly broken. If this is the case, then clean the back of the panels with
acetone, apply 100% silicone instead of standard construction adhesive and adhere the panel directly
over the tiles. Brace with a 1 x 4 or 1 x 2 scrap until dry then install a thicker trim strip over
exposed edges. Seal the trim all the way to the floor.