
Installation Instructions

3P Shower Installation Instructions
Gelcoat & Solid Surface Bathware
ellasbubbles.com | 5
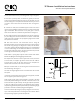
Prepare the seat side wall for permanent installation. Apply a
bead of caulk on the shower base from the front corner to the
center line of back wall using 100% clear silicone adhesive caulk.
This procedure will prominently adhere the wall to the base and
seal o any moisture from the wall cavity.
NOTE: Cosmetic caulking will be required in a later step.
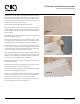
Place wall on base and align into permanent position. Drill holes
through anges and secure ange to stud wall using at head
screws drawing the panel to the wall until wall and base surface is
equally aligned.
NOTE: Panel may need to be pulled to the stud on the front side of the
wall shimming where necessary.
13. After mounting the valve to the stud wall, carefully transfer
the valve location to the wall panel. Cover the surface area with
masking tape to prevent chipping of nish before cutting hole.
After the valve hole(s) are cut, lift the wall back into place to trial
t. Adjust holes or valve if necessary, keeping in mind the need to
make sure the seams and grout lines continue to line up and there
is a consistent gap on vertical and horizontal seams.
NOTE: Plumb stud walls and level oors are the exception rather then
the norm. Some adjustment is usually necessary. When the valve
location is correct and the gap is visually consistent on vertical and
horizontal seams, your dry t procedure is complete.
14. Temporality remove the valve wall o the base to prepare for
permanent installation.
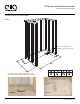
Permanently install the wall by angling the wall to align the center
seam pins. Rotate wall to clear the rough in valve.
NOTE: Run an unbroken bead of caulk the entire length of the halfway
point and circle shipping bolt holes and pin.
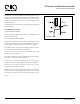
See Figure 11: Use 100% clear silicone adhesive caulk on horizontal
and vertical interior joint surfaces. Color surface caulking will be a
later step. Clear caulking on inner seam is recommended.
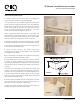
15. Push center seam together hand tight. Wipe clean any excess
caulk that squeezes out from the interior seal.
FIGURE 11
FIGURE 12
FIGURE 13
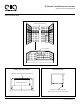
* Apply silicone to front side of ridge