
Installation Instructions


3P Shower Installation Instructions
Gelcoat & Solid Surface Bathware
ellasbubbles.com | 4
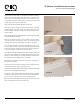
Do not slide shower base on protruding drain tting. See Figure 3
7. Once unit is perfectly level, use marker or grease pen to mark
studs at top and bottom edge of anges as a visual guide. Use 1/8”
countersinking bit to drill pilot holes. Recheck Level as you fasten
to studs to ensure base has not shifted o level. See Figures 4
and 5
8. If shims are used, check the wood support shims to be certain
they are tightly wedged in between the oor surface and the back
leg of the shower. Once the shims are in place glue or nail the
shims to the sub oor to eliminate any movement. See Figure 6
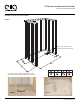
9. Your shower base shall be equipped with one vertical alignment
pin protruding from the base located on the center of back wall
toward seat side of shower. This pin properly aligns the rst back
wall panel to be installed.
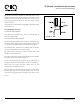
10. Drill holes with the 1/8” countersink drill bit. Using 6D
galvanized screws, secure the shower base to the framing. Tighten
the screws snug and tight to the gelcoat surface, but be careful
not to over tighten and break berglass ange. It is recommended
to use countersinking drill bit which will allow the screw head to
be ush with the ange surface. Large screw heads can protrude
interfering with wall assembly. See Figure 7
NOTE: Shims or furring strips may be used to assure solid contact
between the berglass mounting ange and the studs.
11. Complete a nal check to ensure your base is level, secured to
all three walls, the support leg makes contact with the suboor
and you have a slope to the drain. Now you can complete the
shower drain connection. See drain instructions.
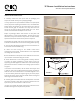
12. Dry-t the seat wall rst. The center grout lines of the base and
wall should align. See Figure 9
You will nd a single alignment hole on the bottom of the seat side
wall panel.
If the base is level and the wall studs are vertically plumb, the wall
will rest properly with consistent gap line.
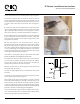
NOTE: If gap is larger in the corner the base is not level or the stud
wall is not plumb. Notching the stud wall to allow the wall to rest
level on the base may be necessary. The dry t inspection procedure
in step one conrms your shower if pre-aligned and free of defect.
Compare the gap with the photos of the shower you took during dry-t
procedure. Correction is needed if the gaps look dierent.
Once seat side wall panel aligns properly and gaps are consistent,
dry t valve wall panel before installing valve on stud wall. When
both panels align properly remove both panels.
FIGURE 8
FIGURE 9
FIGURE 10