
Installation Instructions


3P Shower Installation Instructions
Gelcoat & Solid Surface Bathware
ellasbubbles.com | 3
INSTALLATION INSTRUCTIONS
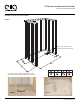
1. Carefully remove the three parts from the packaging and
inspect the shower closely for any shipping damage.
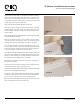
It is very important to dry assemble the shower in an open space
for the purpose of inspecting the shower for t, nish and defects
before moving the shower into the construction area. Check to
ensure that the gaps are consistent. You may notice the front
corners of the wall are slightly pulled inward up to 1/2”. This is
normal as the wall will ex and pull into the studs.
Report any damage, defects and concerns. At this point take
digital photos as a time stamp document. This will protect your
investment, verify the condition of the product- as it was received,
speed the assessment and correction process if required.
Disassemble the shower and set the wall sections o to the side
and move the shower base in front of the framing pocket opening.
2. Use care when handling the shower parts to avoid scratches or
stress cracks from excessive exing.
3. Install the drain tting on the shower. Follow drain
manufacturers instructions. The manufacturer is not responsible
for leaking drain connections.
4. Place cardboard or a drop cloth on the shower oor and on the
top of the seat to avoid scratching the surface.
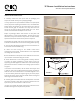
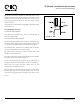
5. Locate wood shims in the framing pocket. Carefully measure
to ensure the proper placement of these shims so they are
supporting the back edge of the shower base. These shims may be
placed after the base is installed if the framing is open as shown
in Figure 2.
If rear access is not available, a thin-set mortar mix may be used
in place of shim to ll the gap beneath the support leg and the
sub oor. Pour thin-set mortar mix to a minimum height of 1 inch
in the area directly below the support leg only to ensure proper
base to oor contact. Do not step into shower before leveling and
fastening to stud wall with screws.
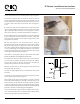
6. Carefully place the shower base into framed pocket. TIP: Place
two 3 foot sections of PVC pipe on the oor beneath the front
apron of the pan as shoe horns or slides to assist.
Use care not to knock the support shims loose or disturb mortar
bed when moving base into permanent position.
FIGURE 4
FIGURE 5
FIGURE 6
FIGURE 7