
Installation Sheet

Floor Service Sink Installation
Installation Instructions
ATTENTION INSTALLER:
1) ELKAY RECOMMENDS THAT FLOOR SERVICE SINKS SHOULD BE INSTALLED BY A
PROFESSIONAL EXPERIENCED INSTALLER.
2)
ELKAY IS NOT RESPONSIBLE FOR SINK FOR SINK IF DAMAGED DURING INSTALLATION.
3) INSPECT SINK FOR DAMAGE PRIOR TO BEGINNING INSTALLATION.
4) METAL EDGES MAY BE SHARP — USE CAUTION WHEN HANDLING.
5) FOLLOW ALL LOCAL PLUMBING AND BUILDING CODES.
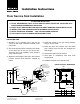
INSTALLING SINK
1) Provide a 4-1/4
"
diameter hole in the floor as
shown per the rough in dimension based on the
sink model.
2) The waste pipe should be centered in the center
of the drain hole in the sink and project 3/4
"
above the floor. The installation must include a
“trap” under the floor.
3) Mount the wall hanger to the wall in the required
position. Anchors and fasteners supplied by
others.
4) Install the strainer to the sink using plumbers
putty or silicone caulk.
5)
Place the sink into position over the waste
pipe, making sure the rear rim engages the
wall hanger.
6) Remove the grids from the strainer.
7)
Seal drain in compliance with local code
requirements.
8) Reattach the grids to the strainer body.
LOCKNUT
FLAT GRID
DOME GRID
D
4-1/4" DIA.
ROUGH IN
7-5/8"
3/8"
10"
OF
SLOTS
3/4"
C
(2) RUBBER
WASHERS &
(1) FIBER
GASKET
SEAL DRAIN IN
ACCORDANCE
WITH LOCAL CODE
REQUIREMENTS
SIDE
WALL
BACK
WALL
q
q
FINISHED
WALL
WALL
HANGER
1/4" X 1"
SLOTS
q
3" WASTE PIPE
(IRON,PVC,& CV)
MUST INCLUDE
A TRAP
UNDER FLOOR
OF
WASTE
PIPE
q
FINISHED
FLOOR
PLUMBER’S PUTTY
OR SILICONE CAULK
BETWEEN SINK FLANGE
AND STRAINER BODY
B
A
SINK
MODEL A B C D
XXX2523 25" 23" 12-1/2" 11-1/2"
XXX3321 33" 21" 16-1/2" 10-1/2"
Elkay
2222 Camden Court
Oak Brook, IL 60523
©2008 Elkay
Printed in U.S.A.
elkayusa.com
(Rev. A 7/08) 74180166
DRAIN ROUGH-IN DIMENSIONS