
Installation Sheet

-2-
elkhome.com
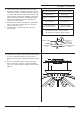
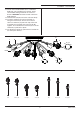
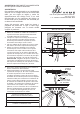
7. Twist end of house lead wire (black) and end
of xture lead wire together. Twist wire nut (C)
onto ends of wires. Completely tighten wire nut
(C). Twist end of house neutral wire (white) and
end of xture neutral wire together. Twist wire
nut (C) onto ends of wires. Completely tighten
wire nut (C). Reference chart to the right for
correct wire connections.
8. Wrap electrical tape (not included) around wire
nuts (C) and wires. Ensure wires are securely
fastened into wire nuts.
9. Carefully push all wires and wire nuts into
junction box.
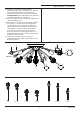
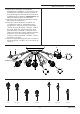
ITEM#: 12764/8
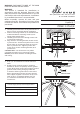
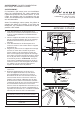
10. Carefully raise xture up to ceiling. Place canopy
(D) over mounting bracket (A). Pass holes in
canopy (D) over ends of xture mounting screws
(E).
11. Screw one threaded cap (F) onto end of each
xture mounting screw (E). Tighten threaded
caps (F) to secure xture to ceiling. DO NOT over
tighten.
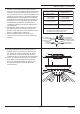
FIXTURE LEAD WIRE HOUSE LEAD WIRE
(BLACK)
FIXTURE GROUND
WIRE
HOUSE GROUND
WIRE (COPPER)
FIXTURE NEUTRAL
WIRE
HOUSE NEUTRAL WIRE
(WHITE)
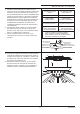
Connect Black Lead
Supply (House) Wire to:
Connect White Neutral
Supply (House) Wire to:
Black Wire or,
*Parallel Cord
(Round and Smooth) or,
Insulated Wire
(other than green)
with Copper Conductor.
White Wire or,
*Parallel Cord
(Square and Ridged) or,
Insulated Wire
(other than green)
with Silver Conductor.
*When parallel wire (SPT 1 & SPT 2) is used:
The lead wire is round in shape or smooth.
The neutral wire is square in shape or ridged.
No printed words on
wire insulation or,
Printed words on
wire insulation or,
GND
A
E
E
F
D
F