
Instruction Manual

-2-
elkhome.com
ITEM#: 82164/1
CAUTION: At least one 6 inch stem must be used.
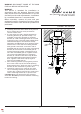
5. Carefully push xture wires up through bottom
of 6 inch stem (N). Pull xture wires out of top
of 6 inch stem (N). Screw bottom of 6 inch stem
(N) onto top of xture body (O).
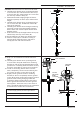
6. Determine desired hanging height of xture.
Select the quantity of stems (M) to achieve that
height.
7. Carefully push xture wires up through end of
one 12 inch stem (M). Thread end of stem (M)
onto top of stem (N).
8. Carefully push xture wires through remaining
stems (M). Screw stems (M) together keeping
xture wires taut. DO NOT pinch xture wires
between stems.
9. Push xture wires up through bottom of loop (S).
Thread loop onto top of last stem (M).
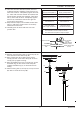
10. Slip threaded ring (F) down over xture wires.
11. Position canopy (D) so outside of canopy is
pointing down towards xture. Slip hole in
canopy (D) over end of xture wires.
F
12. Strip 3/4” of insulation from ends of xture
wires.
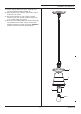
13. Carefully push xture wires up through hole
in screw collar loop (W) attached to mounting
bracket (A) and out end of threaded pipe inside
junction box. Carefully pull xture wires so they
are easily accessible to connect to house wires.
14. To aid in connecting xture wires to house
wires, temporarily connect second locking link
(G) to loop (S) and to screw collar loop (W).
15. Slightly loosen ground screw on mounting
bracket (A). Do not completely remove ground
screw. Wrap house ground wire (copper) around
ground screw, leaving enough ground wire
to attach to xture ground wire. Twist end of
xture ground wire and end of house ground
wire together. Twist wire nut (C) onto ends of
wires. Completely tighten wire nut (C). Reference
chart below for correct wire connections.
D
M
O
W
JUNCTION BOX
GROUND
SCREW
HOUSE
GROUND
WIRE
(COPPER)
FIXTURE
GROUND
WIRE
C
A
Connect Supply (House) Ground Copper Wire to:
Bare Copper Wire or,
Bare Silver Wire or,
Green Insulated Wire.
N
S