
User Guide

5
Rev.062916-DR www.elitescreens.com
Installation Instruction
Wall Screws included with this product are complementary and may not be adequate for all mounting
surfaces. Consult with a professional installer or hardware store for proper mounting screws and anchors.
Please consult a professional installer. Elite Screens is not liable for any faulty installations.
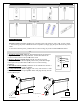
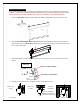
1. Insert each Bolt (B) through the right & left slide channel located on the top of the screen’s case.
2. Slide the Extruded Hanging Bracket (D) through the rail located below the slide channel until it
meets with the top of the Bolt (B) and slightly secure the lug-nuts located on the top & bottom of the
bolt to attach the bracket.
3. Mark the installation location to drill your hole. Insert the proper screw and secure the bolts to the
bracket.
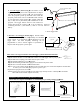
4. Example of the CineTension 2 installed to a wall, ceiling and enclosed.
Top hole for
ceiling installation
Back hole for wall installation
Flush mount
to wall
Flush mount
to ceiling
Enclosed
installation
*
Allow 2” of spacing
between the front and
back of the screen casing.
A & C
A & C
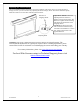
PARTS