
User Guide

Rev.062916-DR
6. Wireless 5-12 volt trigger
(Item F, Fig 5)
control serves as a dual purpose, independently as a handheld
remote control, or in conjunction with the Wireless 5
trigger cable. The radio
frequency technology can be
programmed to send a wireless signal to synchronize its
drop/
rise with the projector’s power cycle.
Hardware Parts List for
CineTension 2
Please make sure all parts listed below are included before proceeding with the installation.
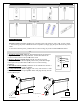
A. M12 Dry-wall anchor x 4 or 6
B.
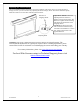
Here’s how to set up your Wireless 5
-
Step1: Connect one end of the
3.5 mm wireless 5
Step 2
: Connect the other 3.5 mm end of the wireless 5
Step 3:
Make sure to unplug your screen from the power outlet
Step 4: Hold the UP button on your
RF re
Step 5: While holding the UP
button, plug the screen back to the power outlet
Step 6
: Wait 5 seconds and then release the
Step 7: Your 5-
12V wireless trigger should now be activated with your screen and ready to be used and able
to control y
our screen with your projector’s power cycle
Repeat the steps again if not successful.
(Please be aware, the projector on/off cycle may take longer to fully activate
30
seconds for full off and on cycle each time)
5.
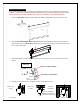
5-12 volt trigger
(Item D, Fig 4)
trigger input allows your screen to synchronize its drop &
rise with the projector’s power cycle. The screen deploys
when the projector
powers up and will retract when the
projector powers down. The 5-
12 volt RJ45 cable connects
to your projector’s trigger output via a separate cable that
may or may not be provided by the manufacturer of the
projector. The trigger feature will not work wit
output cable from the projector, but it can be tested by
connecting the Red (+) and Green (
battery.
4
5-12 Volt Trigger Cable
(Item F, Fig 5)
: The RF remote
control serves as a dual purpose, independently as a handheld
remote control, or in conjunction with the Wireless 5
-12 volt
frequency technology can be
programmed to send a wireless signal to synchronize its
rise with the projector’s power cycle.
CineTension 2
Series
Please make sure all parts listed below are included before proceeding with the installation.
B.
Bolt x 2 or 3
C. Masonry Screw x 4 or 6
C.
Extruded Hanging Bracket
120” & above x 3 brackets
Red: D
C 12 +
Green: 0 V -
RJ
-
12 volt trigger | Synchronization Instructions
3.5 mm wireless 5
-12 volt trigger cable to the RF remote.
: Connect the other 3.5 mm end of the wireless 5
-
12 volt trigger cable to your projector
Make sure to unplug your screen from the power outlet
RF re
mote
button, plug the screen back to the power outlet
: Wait 5 seconds and then release the
UP button
12V wireless trigger should now be activated with your screen and ready to be used and able
our screen with your projector’s power cycle
Repeat the steps again if not successful.
(Please be aware, the projector on/off cycle may take longer to fully activate
. It usually takes around 20
seconds for full off and on cycle each time)
(Item D, Fig 4)
:
The built-in 5-12V
trigger input allows your screen to synchronize its drop &
rise with the projector’s power cycle. The screen deploys
powers up and will retract when the
12 volt RJ45 cable connects
to your projector’s trigger output via a separate cable that
may or may not be provided by the manufacturer of the
projector. The trigger feature will not work wit
hout an
output cable from the projector, but it can be tested by
connecting the Red (+) and Green (
-) cable to a 9-volt
Fig.4
DC
5
-
12V
The back of the
projector
Wireless5-12V trigger cable
www.elitescreens.com
Please make sure all parts listed below are included before proceeding with the installation.
Extruded Hanging Bracket
x 2 or 3
120” & above x 3 brackets
3
-
prong power cable
RJ
-
45 input for 5
-
12V Trigger
12 volt trigger cable to your projector
12V wireless trigger should now be activated with your screen and ready to be used and able
. It usually takes around 20
-
UP
Stop
Down
Fig 5