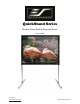
QuickStand Series Portable Frame-Folding Projection Screen User’s Guide Rev043010-JA www.elitescreenscom info@elitescreens.
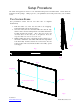
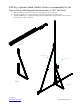
Setup Procedure The frame and supports are made of 1 3/8” aluminum tubing with an anodized finish. Please follow the instructions in this package. With proper care, your QuickStand screen will provide many years of reliable service. Two Section Frame (For presentation screens that are less than 120” in diagonal measurement) 1. Take the frame out of the case and remove its wrappings. Unfold the main joints as shown in (fig 1). 2.
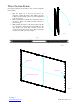
Three Section Frame (For large presentation screens that are 120” or more in diagonal measurement) 1. Take the frame out of the case and remove its wrappings. Unfold the main joints making sure that both the end and middle spans are in prefect alignment as shown in (fig 4). 2. Make sure that the snap latches have locked the joints in the frame so that it is at its full horizontal extension as shown in (fig 5) 3.
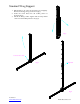
Standard T-Leg Support 1. Take the T-Leg out of the case and remove its wrappings. Fold down the support legs as shown in (fig 7). 2. Secure the corner braces into the locked position as shown in (fig 8) 3. Unfold the T-Leg’s main support until the snap latches “click” into the locked position as in (fig 9). fig 7 Lock down the corners fig 8 Snap latch fig 9 Rev043010-JA www.elitescreenscom info@elitescreens.
AT-Leg (optional support buttress recommended for the large screens with diagonal measurements of 150” and over) 1. Take the AT-Leg buttress out of the case and remove its wrappings. Unfold the buttress as shown in (fig 10). 2. Snap latches will automatically lock in the center joint. Use the snap latch buttons to unlock the end joints as shown in (fig 11). 3.
SAT-Leg (optional added stability buttress recommended for the large screens with diagonal measurements of 180” and over) 1. Take the SAT-Leg out of the case and remove it wrappings as shown in (fig13). 2. Undo the snap locks to loosen and bend the joints for proper fitting as shown in (fig 14). 3. Attach the SAT-Legs by securing the locking bolts through the frame using the frame spacers between the metal parts as shown in (fig 15) fig 13 frame spacer locking bolt fig 14 fig 15 Rev043010-JA www.
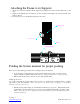
Attaching the Frame to its Supports 1. Always use at least two locking bolts through the T-Leg Support, the Spacer and into the Frame on each side. 2. Height can be adjusted in 8” increments up or down. Normal screen height is 44” from the bottom of the frame to the floor. 3. Reverse this process to dismantle and pack away the screen.
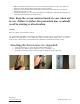
2. Make sure that the first folds never exceed 3 feet in width (fold again if necessary). Also make sure that there is always clean packing paper in between the two surfaces. 3. Larger sized screens will need to be folded with more frequency than smaller screens. Follow the instructions from step 1 as well. 4. Fold the material from top to bottom first then alternate in folding left to right until the material is of a sufficient size that will fit into the leatherette case.
Parts List 1. Frame x 1 piece 2. Support (T) Legs x 2 pieces 3. AT-Legs x 2 pieces (optional depending on size) 4. SAT-Legs x 2 pieces. (optional depending on size) 5. Screen Fabric x 1 piece 6. Locking Bolt x 6-26 pieces 7. Frame Spacer x 6-26 pieces 8. User Guide x 1 pieces Please make sure all parts listed are supplied. Should any parts be missing contact us at service@elitescreens.com The following points should be noted to assure the sound performance and longevity of your screen 1.
CONTACTS US & Canada Tech Support & Warranty Claim Please contact us at service@elitescreens.com or call +1 877-511-1211 #3 Service Europe Tech Support & Warranty Claim Please contact us at service@elitescreens.eu or call +49-(0) 40-30392958 Asia Tech Support & Warranty Claim Please contact us at service@elitescreens.com.cn or call +86-(0) 755-8461-7989 Taiwan Tech Support & Warranty Claim Please contact us at service@elitescreens.com.tw or call +886-(02) 2747-8979 America: Elite Screens Inc.