
Instruction Manual


Renogy Charge Controller Model No. PWM10CC
2
5. After all connections are made, power ON the charge controller by pressing the
SET button.
6. To test the system for proper connections, press the SET button on the charge
controller until you see the number 17 (see description below).
7. Make sure the solar module(s) voltage and current do not exceed the ratings of
the charge controller.
Lighting Control Options
1. Press the SET button for about 5 seconds and select the desired lighting control
option. The LED will come on, which will indicate that you have selected an
option.
2. The controller requires about 10 minutes of continuous transition values before it
starts working properly. These constraints avoid false transitions due to lighting
or shading.
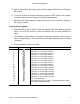
3. A brief description of the work mode:
Number
LCD Display
Description of Work Mode
0
Dusk-to-Dawn, light id on all night
1
Light turns on 1 hour after sundown
2
Light turns on 2 hour after sundown
3
Light turns on 3 hour after sundown
4
Light turns on 4 hour after sundown
5
Light turns on 5 hour after sundown
6
Light turns on 6 hour after sundown
7
Light turns on 7 hour after sundown
8
Light turns on 8 hour after sundown
9
Light turns on 9 hour after sundown
10
Light turns on 10 hour after sundown
11
Light turns on 11 hour after sundown
12
Light turns on 12 hour after sundown
13
Light turns on 13 hour after sundown
14
Light turns on 14 hour after sundown
15
Light turns on 15 hour after sundown
16
Turn on/off light mode
17
Test mode; lights turns on after no sunlight detected or lights
turn off after sunlight detected.
Table 2. Lighting control options
eLineTechnology.com