IP WEB User Guide V1.0 Please read carefully before contacting your supplier. Information is correct at time of printing, but can be subject to change without notice, whilst every effort has been made for accuracy product improvements may enhance the features or functions. eLineTechnology.
IPWEB Guide --CONTENT-FIRST CHAPTER WEB LOGGING IN ......................................................................................................................... 3 1.1 ACTIVEX CONTROL SETTING...................................................................................................................................... 3 1.2 WEB LOGIN ..............................................................................................................................................................
IPWEB Guide 2.12.2 user setting ................................................................................................................................................. 26 2.13 PROTOCOL ............................................................................................................................................................. 27 2.13.1 Protocol information ...............................................................................................................................
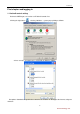
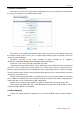
IPWEB Guide First chapter web logging in 1.1 ActiveX control setting Before the WEB log on, we need to set IE ActiveX controls first. Clicking the right mouse ,selecting “Attribute”,system pop up dialog as follows: Select “security” “Custom level”), system pop up dialog as follows: Put options "download unsigned Actives control” to be enabled. Or directly put the Internet safety to a minimum. -3- eLineTechnology.
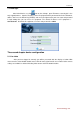
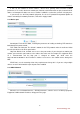
IPWEB Guide 1.2 WEB login After ActiveX to be set, click icon on the desktop,open IE browser, currently this is the only support browser,input the IP address of the IP equipment which you want to land in the IE browser address bar. Press the Return Key (ENTER), and ensure be right to enter your user name and password in login dialog then you can access IP equipment. The default IP address of IP equipment is: 192.168.0.
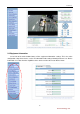
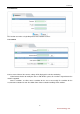
IPWEB Guide 2.2 Equipment information On left side of the main window features all the "equipment information” settings. This is the entire configuration setup for the device, such as IP information audio settings network parameters’ etc. Device Information is used to show the capabilities of the device and also the master Device Name. -5- eLineTechnology.
IPWEB Guide 2.3 Stream configuration Click features list on the left, select "Stream configuration”, then you can configure stream video for the current IP equipment. As the following figure shows: Each device can be configured for different video stream; each device can be configured with up to three different video streams. This let you set a high quality recording stream and perhaps a low level stream for remote monitoring.
IPWEB Guide The router address: fill the router WAN address, support filling in domain name address, such as test.gicp.net。 Control mapping port should remain consistent with control ports of "device configuration”-“equipment port” Default should be 3001 This function detailed please refer to the document “set instructions of IP equipment WAN nets visit”. 2.5 Device configuration 2.5.1 Local Network -7- eLineTechnology.
IPWEB Guide It Can set the network IP camera address, subnet mask, gateway, DNS and other network parameters, If it is used in local area network you should be careful that not to set up the internal LAN IP address and computer IP address to cause a conflict. If a HDCP is set then the current IP is display here. If you want to use the IPv6 protocol equipment, first in the IP protocol IPv6 protocol options to choose and modify the network parameters, click on the "Apply" button. 2.5.
IPWEB Guide 2.5.4 multicast This function can make a single flow provide more network receivers. 2.5.5 camera Camera name: Name of the camera settings will be displayed in real-time monitoring Video formats whether to modify the device's PAL/NTSC system, this function is dependent on the model if supported. Source resolution: set video source resolution for the 4:3 or 16:9.usually D1 resolution for the 4:3,704×384 resolution for 16:9. Also allows lower video resolution for 2Mega Pixel solutions.
IPWEB Guide 2.5.6 Date & time Select the method to use for setting the time: one is to set the time according to the clock on your computer; another is to manually enter the time and date. 2.5.7 OSD settings Respectively for different resolutions of network device to set OSD parameters, a tick indicates this information is displayed as overlay on encoded video stream including: device name, channel number, -10- eLineTechnology.
IPWEB Guide channel name, time and custom OSD. 2.5.8 Microphone setting Microphone Type: Internal:built-in microphone. (if fitted) External: Where supported will select the Audio Input as audio source for Line in: Audio is encoded inside the video stream, audio format is set under the Streaming Settings. 2.5.9 Dome PTZ IP high-speed dome can set PTZ address. 2.5.10 system service -11- eLineTechnology.
IPWEB Guide 2.5.11 system Configuration Change the language for week OSD and alarm E-mail of the IP device. 2.6 External Device IP equipment can connect external equipment such as external PTZ, PTZ keyboard and currency counting. 2.6.1 PTZ When connect external PTZ control device via the serial, used for older style pan/tilt devices, you can configured PTZ agreement address, bit rate, data bit. -12- eLineTechnology.
IPWEB Guide 2.6.2 PTZ Keyboard When connect PTZ keyboard, you can configure interface type, serial ports, bit rate, data bit. 2.6.3 cash Registers When connect external cash, can add the number that currency counting counts to the video though OSD. Note: this function needs especial external equipment to support this function. -13- eLineTechnology.
IPWEB Guide 2.7 Alarm configuration Alarm configuration, including alarm I/O port configuration, Disk warning, I/O alarm linkage, and motion detection alarm. 2.7.1 Alarm I/O Parameter Configuration Alarm input: Select the alarm input configuration ID, the alarm can be chose the effective level. Effective level include: high and low two options.
IPWEB Guide 2.7.2 Disk Alarm configuration Disk Alert configuration including: disk error alarm and disk full alarm. Disk alarm will be recorded in the alarm log. 2.7.3 I/O Alarm Linkage configuration Note: Before the opening of the record, we must first configure the "Local Record" "Record Policy" parameter. Options need to configure the alarm I/O of the ID number, can be configured in the Alarm I/O trigger the alarm when the linkage.
IPWEB Guide 2.7.4 Motion Alarm configuration Note: Before the opening of the record, we must first configure the "Local Record" "Record Policy" parameter. Options the camera that need to configure ID number, can be configured to detect movement of the camera to trigger the alarm when the linkage. Including whether the alarm output and whether or not such as the opening of PTZ.
IPWEB Guide Require the deployment of the week, and set the beginning and ending days of deployment time, click the "Add" button, click "OK" button. Click on "Detection of regional Configuration": Area Motion: Press and hold the left mouse button on the video in order to facilitate the sliding region configured to detect regions, when the need to remove the detection region can click the right mouse button. The most mobile region can not detect more than eight.
IPWEB Guide Need to set up the camera to choose ID, you can set the camera to record the quality of SD cards, including: resolution, frame rate, bit-stream parameters. Schedule Record: Including 7X24-hour record and schedule record. When you select from time to time recording, click the "set-up time", -18- eLineTechnology.
IPWEB Guide Select the week to record, and set recording beginning and end of the day time, click the "Add" button, click the "OK" button。 Alarm record: fill in the Length of pre-recorded and Length recorded continued, Length of pre-recorded up to 30 seconds max.
IPWEB Guide 1. SD card:SD Card: Click on the SD card entry, click on the button "modify", you can format the SD card, the following figure: Disk name:can be set to directory name. Disk group:the default into 1-8 group. Available space:the directory can be equipped with video available space 0 for not restriction of size. File system:divided into Video and ext. 2, NAS: Click on the NAS entry, click on the button "modify", and the following figure: -20- eLineTechnology.
IPWEB Guide Set the correct IP address of the NAS, path, username and password, Click enabled, you can record video directly to a device on the NAS. 3. FTP:Click on the FTP entries, and click "modify" button, pop-up below Set the right FTP IP address, port, account number and password, click the "opening" button, equipment video recording can directly record to the FTP. Normally ftp port is 21 2.
IPWEB Guide than 8% total image space. 2.10 Network Service 2.10.1 NTP -22- eLineTechnology.
IPWEB Guide NTP: Network Time Protocol。Host can automatically adjust the clock of the computer and connect sync. Click "Apply" button and then automatically adjust the time. 2.10.2 PPPoE PPPoE: Network Camera support agreement based on the PPPoE WAN access.
IPWEB Guide 2.10.4 Update You can be set to upgrade the server IP address and port number as well as parameters such as the upgrade cycle. Upgrade cycle: unit is minutes; the upgrade process for each time interval to upgrade the server asked whether there is a need to upgrade the new version. Specific steps to upgrade please refer to "Chapter III." 2.11 Service Center 2.11.1 Alarm center Alarm center:when alarm triggered ,the alarm event is sent to the alarm center as per the IP address.
IPWEB Guide 2.11.2 SMTP After SMTP is enabled, when triggered by motion detection, alarm and I / O alarm will be automatically sent JPG pictures and alarm information to the recipient's mailbox. -25- eLineTechnology.
IPWEB Guide 2.12 Privilege Manager 2.12.1 Authority group setting You can add, modify, or delete access group, but the default permissions group administrators can not to be deleted. 2.12.2 user setting You can add, modify, delete a user, but the default user admin can to be deleted. The default user can unlock the customers which input wrong password for many times. Support more login: when the user choice "yes" in Multi login, the user can land and user the equipment on different PC at the same time.
IPWEB Guide 2.13 protocol 2.13.1 Protocol information Can see the current equipment agreement name and version number. 2.13.2 Security When the equipment is Onvif protocol connect, you can choose whether security checks or not. 2.13 Device Restart IP CAMERA to use remote control equipment, to resume operation. 2.15 Default settings The parameter of the IP equipment will restored to the factory value. -27- eLineTechnology.
IPWEB Guide -28- eLineTechnology.