USER MANUAL Indoor/Outdoor IR Vandal Dome ELI‐EVC eLineTechnology.
CAMERA ELI‐EVC / ELI‐EEVC USER MANUAL eLineTechnology.com Table of Contents PRODUCT DESCRIPTION ....................................................................................................................... 3 FEATURES ............................................................................................................................................... 3 MODELS...................................................................................................................................
CAMERA ELI‐EVC / ELI‐EEVC USER MANUAL eLineTechnology.com Product Description Indoor/Outdoor IR Vandal Dome Congratulations on your purchase of this product. This analog surveillance dome features advanced functions in a compact body and is suited for tight, indoor or outdoor environments. The camera utilizes advanced Sony image sensor technology producing high definition, realistic color.
CAMERA ELI‐EVC / ELI‐EEVC USER MANUAL eLineTechnology.com 14. Keep the camera cable away from the lighting cable. Failure to observe this may cause noise. 15. When the camera is used near a TV/radio antenna, strong electric field, or magnetic field (near a motor or a transformer), images may be distorted and audible noise may be produced. In such a case, route the camera cable through specialized steel conduit tubes. CAUTION: TO REDUCE THE RISK OF ELECTRIC SHOCK, DO NOT REMOVE COVER (OR BACK).
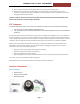
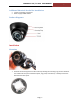
CAMERA ELI‐EVC / ELI‐EEVC USER MANUAL eLineTechnology.com Additional Materials Needed for Installation Tape for protecting connections Power supply 12VDC 350mA Product Diagrams Installation Mounting 1. Unscrew the mounting base from the camera by twisting the mounting ring counter‐clockwise. This releases all four parts of the dome (base, ring, hood, and camera). Carefully remove the base from the other parts.
CAMERA ELI‐EVC / ELI‐EEVC USER MANUAL eLineTechnology.com 2. Use the mounting base as a guide to mark the locations for screw and cable management holes on the mounting surface. Drill a starter hole at each marked location. Drill a cable management hole in the center at least 14mm in diameter to permit the camera’s cable to be inserted through the mounting surface. If necessary, insert drywall anchors into the screw holes. 3. Place the mounting base into location.
CAMERA ELI‐EVC / ELI‐EEVC USER MANUAL eLineTechnology.com Adjusting the Camera 1. To adjust the camera angle, loosen the mounting ring just enough to move the camera but not too much as to make the mount unsecure. 2. After the lens and the hood are into position, tighten the mounting ring. Focusing On models with a varifocal lens, you may adjust the focus and zoom by turning the screws on the sides of the camera. 1. The screw on the left will adjust the lens focus. 2.
CAMERA ELI‐EVC / ELI‐EEVC USER MANUAL eLineTechnology.com On‐Screen Display (OSD) Settings On the OSD control device on the cable, hit the center button to activate the OSD settings. The menu as below will appear. Use the button by moving up/down/left/right and depressing as ‘Enter’ to change OSD settings. For further definition of each setting see the eLine web site under Support. http://www.elinetechnology.com.
CAMERA ELI‐EVC / ELI‐EEVC USER MANUAL eLineTechnology.com Specifications Feature Specification Minimum Illumination S/N Ratio Scanning System Synchronous System Auto Electronic Shutter Gamma Characteristic IR Distance 0.001 Lux / 0 Lux (with IR LED ON) More than 50dB 2:1 Interface Internal, Negative sync NTSC: 1/60s~1/100,000s / PAL: 1/50s~1/100,000s 0.45 Model Dependent 20 Meters (with ȼ5x24 pcs Infrared LED) 30 Meters (with ȼ5x36 pcs Infrared LED) 1Vpp.
CAMERA ELI‐EVC / ELI‐EEVC USER MANUAL eLineTechnology.com Blurred Image Check the dome cover for dirt or imperfections Check the focus to make sure adjusted correctly Check the lens of the camera to make sure it is clean. Only use a dry, clean lens cloth to clean the lens. Never touch with your fingers.