
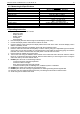
Technical data


Owner’s Manual
8
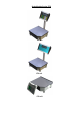
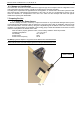
7.2. Installation of the Label Roll
1. Open the top cover (platter)
2. Place the label roll
3. Unlock the thermal print head by pushing the button (Fig.7.2)
4. Feed the paper tape through the slot between the 2 shafts and the thermal print head
5. Fix the caring paper tape to the rolling mechanism with the Press Bracket (Fig.7.2)
6. Close the thermal print head by pushing it against till you hear “CLICK”
7. Press the PRN key with the top cover open. The printer should eject one or more blank labels
Fig. 7.2
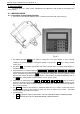
7.3. Connecting External PC Keyboard
Connect the keyboard to the connector labeled „KEYB” located on the side of the Main Display block
Fig. 7.3
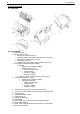
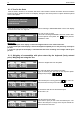
7.4. Connecting External Devices
On Fig.7.1 are shown all interface connectors of the ETS scale.
1. The scale can be connected via Ethernet Connection to network SWITCH or HUB by its standard 8 pin
RJ45 connector labeled on Fig.7.1 as “Ethernet”
2. The connectors RS232 are labeled on Fig.7.1 as „RS232” and are designed as:
a. RS1 – 4 pin RJ11 is situated in the middle next to the 8 pin RJ45 – designed for direct RS232
connection with PС. The speed of the transfer is setup in SERVICE MODE.
b. RS2 - 4 pin RJ11 is situated on the far left end – designed for loop connection with scales
type EVL or EEP.
3. Unlocking the
thermal print head
5. Press bracket