
Technical data


Owner’s Manual
22
3.1.4. WEIGH MODULE – Calibration of the scale – Detailed calibration instructions are attached in
separate CALIBRATION INSTRUCTION
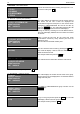
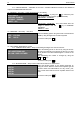
3.2. PRINTING – print setup – labels, automatic print, print density
PRINTING SETUP
MEDIA -LABELS
DISPENSER - ENABLED
AUTOPRINT – DISABLED
DENSITY – 00%
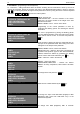
MEDIA –LABELS – by using the + key choose the print
type on labels or thermal paper (LABELS/PAPER)
DISPENSER – ENABLED
AUTOPRINT –DISABLED – auto prints labels when the
weight is defined. Use the + key to ENABLED/
DISABLED
DENSITY – 100%
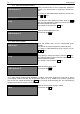
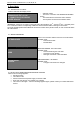
3.3. TIME/DATE – time setup – date, time
SETUP TIME/DATE
DATE: 15-12-2008
TIME: 14:04:30
Place the blinking pointer using the arrows to set DATE and
TIME by using the digits from the main keyboard.
To exit the mode press CP
3.4. TEXT LINES –abbreviations, months
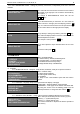
3.4.1. COMMON TEXT LINES – Setup of advertising messages and common text lines
COMMON TEXT LINES ENG Rep
LINE1>ADVERTISING LINE1
WELCOME , DEAR CUSTOMER!
Place the blinking pointer on the text by using the arrows.
By using the external PC keyboard type the text you want
to be printed on the label. Advertising line 1 shows on the
display.
The advertising line number is changed by using the
+ and * keys.
To exit the mode press CP
3.4.2. MONTHS NAME – Setup of the month’s names and use of abbreviations
MONTHS NAMES ENG Rep
MONTH1=
MONTH2=
MONTH3=
MONTH4=
Place the blinking pointer on the desired parameter by
using the arrows. With the external PC keyboard type the
month’s names and abbreviations for day, month, year,
time. These names will be used for expiration dates in text
form.
To exit the mode press CP