
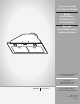
Use and Care & Installation Guide

9
Install range hood
I WARNING
EXCESSIVE WEIGHT HAZARD.
USE TWO OR MORE PEOPLE TO MOVE AND INSTALL
RANGE HOOD.FAILURE TO DO SO CAN RESULT IN BACK OR
OTHER INJURY.
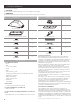
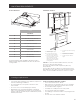
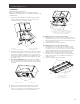
1 Using 2 or more people, lift the hood liner into its mounte
location. Attach with four 4.2 x 19 mm screws into the
slotted openings. Do not tighten screws.
A
B
C
D
A. Cabinet
B. Hood liner canopy assembly
C. Screws - 4.2 x 19 mm (8)
D. Spacer (optional)
2 If needed, insert spacers between each side of the canopy
and the mounting plate to space and center the canopy
inthe cabinet. Align the bottom of the canopy with the
bottom of the cabinet. Install four 4.2 x 19 mm screws into
the round mounting plate openings and tighten all eight
mounting screws.
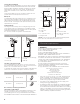
3 (For some installations): A filler strip may be required
for some cabinets.Install a filler strip and secure with two
4.5 x 13 mm screws from inside the front of the hood liner
assembly.
B
A
A. Screws: 4.5 x 13 mm B. Filler strip
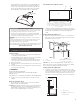
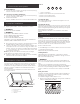
4 Remove the metal grease filters from the face panel.
5 Attach the face panel to the hood liner. (Three sizes:
The30”x 12” [76.2 cm x 30.5 cm] cabinet size is shown.)
See instruction below for your specific cabinet size.
A
B
C
D
A. Screws: 3.5 x 9.5 mm flat-head (4)
B. Face plate (30” x 12” [76.2 cm x 30.5 cm] shown)
C. Cabinet (30” x 12” [76.2 cm x 30.5 cm] shown
D. Screws: 4.2 x 15 mm truss-head (2)
For cabinet size: 30” x 12” (76.2 cm x 30.5 cm)
1 Attach the 30” x 12” (76.2 cm x 30.5 cm) face panel (su-
pplied with range hood) to the hood liner using four 3.5 x
9.5 mm flat-head screws and two 4.2 x 15 mm truss head
screws. Tighten to secure.
2 Connectthelamp electrical connector.
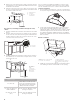
For cabinet size: 30” x 18” (76.2 cm x 45.7 cm)
1 Assemble the 30” x 6” (76.2 cm x 15.2 cm) face panel
rear extension (see the “Assistance or Service” section
to order) to the 30” x 12” (76.2 cm x 30.5 cm) face panel
(supplied with the range hood) using eight 4.2 x 8 mm
screws (supplied with the face panel rear extension).
2 Attach the 30” x 18” (76.2 cm x 45.7 cm) face panel
assembly to the hood liner using four 3.5 x 9.5 mm flat-
head screws and two 4.2 x 15 mm truss head screws.
Tighten to secure.
3 Connectthelamp electrical connector.
A
B
C
A
A. Screws: 4.2 x 8 mm (8)
B. Face panel
C. Face panel rear extension