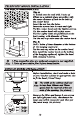
WALL MOUNTING INSTALLATION Prepare pencil, electric drill, plastic wall anchors and level before installation. Recommended installation height: 700mm Required minimum installation height: 650mm Drill 3 x 8mm holes to accommodate the bracket. Screw and tighten the hook onto the wall with the screws & plastic wall anchors provided. Lift the cooker hood and hang onto the wall hook. Need to drill 2x8mm extra holes & fixing screws & plastic wall anchors before installation.
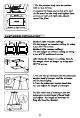
Put the upper chimney into lower chimney . Then pulling out the upper chimney upwards. Adjust to reach the height required. There are 2 methods for installing the chimney cover. Please check the attached pic for reference. 1. After drilling the 2 holes and fixing the bracket, hang the chimney cover by matching the both side 2.
If your cooker hood is going to be used in extraction mode, then you should connect the ducting hose to the ceiling adapter at this point. Fix the upper chimney section to the hanging plate, using the 4 self tapping screws. Slide the lower chimney section onto the angle bars and raise it until it sits just below the upper chimney section. Remove the hanging hook and then slide the lower chimney section downwards, until it rests against the main body of the cooker hood.
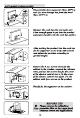
Two ways for Way A (Wall mounted): According to the center distance of hole in the back of the slim hood, measure the position and then drill PCs Dummy holes on the wall. Insert the plastic wall anchors into each holes and tighten PCs ST4x30 screws into the plastic wall anchors. Place the slim hood onto the tighten screws. Fix the cooker hood with safety screw. The two safety screw vents are positioned on the back casing, with diameter of 6mm. Put the one-way-valve onto the hood to finish installation.
TELESCOPIC MODEL INSTALLATION Two ways for Way A: To install onto the wall drill 2 holes of 28mm on a suitable place according with the center distance of hole in the back of the cooker hood. Insert the nut into the holes. Insert the screws into the nuts and tight. Put the cooker hood onto the tighten screws. Fix the cooker hood with safety screw. The two safety vents are positioned on the back casing, with diameter of 6mm. Put the one way valve onto the cooker hood.
81 292/492 81 499/699 g| 4 Tighten up pests screws 1.Fix the product body into the cabinet with 12 pes screws. 2.connect the lamp and switch wire and fix the panel on the body and tighten PCs screws per left and right side, finally install the filter. LAMP MODEL INSTALLATION , Method 1(for wooden ceiling): Tox 2 Fix the hanger on wooden ceiling by using = = 4 pes ST4*30 screws. [] | (] Method 2(for cement ceiling): | Fix the hanger on cement ceiling by using pes antiknock screws.
LIFT MODEL INSTALLATION Disassemble PCs supporter (PCs M4*12) and Ipc wire-storage box from the hood (apes ST3*12). Measure the cook top size and make sure it has enough space to put into the product and panel should be fix the cook top surface. After putting the product into the cook top, fix the supporter on the body with screws and adjust the position according to ground height.