
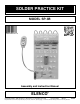
Instruction Manual

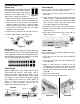

Soldering Iron
Drag Iron
Solder Bridges
PC Board
Figure 6
Double Pads
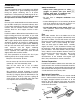
Before we begin to assemble and solder
the components to the solder practice
PC board, we will start first by practice
soldering to the double pads on the
edge of the PC board (see Figure 4).
1. Apply a small amount of solder to the iron tip. This
allows the heat to leave the iron and onto the foil.
2. Place the iron on the top half of pad and then
apply the solder (see Figure 5). Allow the solder
to flow around the pad. Then, remove the solder
and the iron and let the solder cool. The solder
should be neat and smooth.
3.
Repeat step 2 on the bottom half of the pad (see Fig. 5).
4. Practice again on the second large pad.
Single Pads
Now practice using the single pads. Start with the four
square pads and use the same soldering procedures
as the large pads. Note that the spacing between the
pads decrease as the pads get smaller. Be sure there
are no solder bridges between the pads.
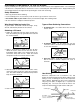
Solder Bridge
Solder bridges occur when solder runs between
circuit paths and creates a short circuit. This is
usually caused by using too much solder. Try to
intentionally make a solder bridge on each section
(see Figure 6). Then, remove it by simply dragging
your soldering iron across the solder bridge as
shown. It is best to wipe the iron tip with a wet
sponge to remove the solder. You can also use
solder wick as described on page 7.
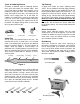
Tack Soldering
You will make 10 tack solder connections by
soldering five wires to the top row of pads.
1. Cut 5 one-inch wires and strip 1/8” insulation off
both ends.
2. Place the iron and the wire on top left pad as
shown in Figure 7. Allow the solder to flow around
the wire. Then, remove the iron and let the solder
cool. You may need to add some more solder.
The solder should be neat and smooth.
3.
Pull the wire to make sure you have a good solder joint.
4. Bend the wire and solder it to the next pad, as
shown in Figure 7.
5. Now solder the remaining wires to the pads as
shown in Figure 7.
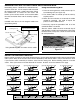
Jumper Wires
In this section, you will solder 20 jumpers between
the two rows of holes.
1. Cut a one-inch wire and strip 1/8” insulation off
both ends.
2. Insert the wire between the top and bottom hole
(see Figure 8a).
3. Apply a small amount of solder to the tip.
Immediately apply solder to the opposite side of
the connection, away from the iron. Allow the
heated wire and circuit foil to melt the solder (see
Figure 8b).
4. Cut off the excess leads.
5. Solder the remaining 19 jumper wires.
Figure 4
Figure 5
Figure 7
Figure 8b
Figure 8a
Jumper
Wires
Soldering
Iron
Solder
SOLDER PRACTICE
Solder
Soldering Iron
Soldering Iron
Solder
-5-