
Manual


-98-
B
egin by sliding the switch to position B and wiring
the circuit. This LED flasher uses two diodes. As
you build this experiment, be sure to connect these
d
iodes in the correct direction.
When you finish assembling the experiment, turn on
the power by sliding the switch to position A, and
press the key. The LED starts blinking immediately.
Even if you don’t press the key, this LED flasher
starts flashing shortly after you turn on the power; if
you press the key, it begins blinking right away.
This LED flasher uses an operational amplifier as
an astable multivibrator, but its flashing time is much
shorter because of the two diodes.
N
otes:
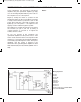
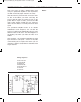
EXPERIMENT #79: LED FLASHER
Schematic
Wiring Sequence:
o 81-31-63-131-138
o 33-67-88-90-76
o 68-115-137-128-125
o 69-87-82-84
o 83-70-116-121
o 75-127
o 89-126
o 119-124
o 122-132
EP-130_62315RevC.qxp_EP-130_062812 6/23/15 11:17 AM Page 98