
User manual Element4

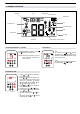
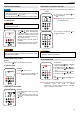
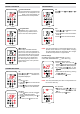
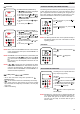
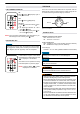
Table Of Contents

AM
PROCONTROL APP
NOTICE
Before the app can be used, the Wi-Fi Box must be wired
and plugged into mains power according to ProControl App
Setup diagram (and the App Setup must be completed.
1 2
ON
AM
PM
OFF
If Thermostatic, Program or Eco Mode
is activated, the corresponding icon and
“
” is displayed on the Handset.
The modes can be operated according
to the descriptions on previous pages.
NOTE:
In Manual Mode “
” is NOT
displayed on the Handset.
LIGHT / DIMMER OPERATION
The Puck is a smart control that works in conjunction with the
GV60 / Symax system. Its basic functions include turning the fire
on and off and turning the flame height up and down.
TECHNICAL DATA
AMBIENT TEMPERATURE RANGE
CSA: The Puck: 32 °F to 131 °F
CE: The Puck: 0 °C to 55 °C
RADIO FREQUENCY
CSA: 915 MHz for U.S. and for Canada (The Puck, Receiver)
CE: 868 MHz for Europe (The Puck, Receiver)
Power Supply
Handset: 2 x 1.5 V “AAA” (qualitative alkaline recommended)
NOTICE
Wiring of valve and Receiver must be completed before
starting ignition. Failure to do so could damage the
electronics.
NOTICE
The Handsets and Receivers are not interchangeable
with previous electronics.
To avoid damaging the electronics, do NOT use metal tools
to remove the batteries from the Handset / Receiver.
▪
▪
Without using a mains adapter, battery replacement is recom-
mended at the beginning of each heating season.
Old or dead batteries should be removed immediately. If left
in the unit the batteries can overheat, leak, and / or explode.
▪ Do NOT expose batteries (including during storage) to direct
sunlight, excessive heat, �re, moisture, or severe impact. Each
of these conditions can cause the batteries to overheat, leak,
and / or explode.
▪ Batteries must be kept within their recommended temperature
limits (ambient battery temperature range: 32 °F to 131 °F /
0 °C to 55 °C).
▪ New and old batteries and different brands of batteries should
not be used together. Mixing of various batteries can cause
the batteries to overheat, leak, and / or explode.
THE PUCK
ON/OFF
Up/ HI
Down / LO
Figure 2: Lay-out 3 Buttons
displayed). Light is
ON:
Press button (
on at preset level.
OFF:
Press
button ( disappears).
SETTING:
1. Press
button and hold until ash-
es.
2. To adjust light between 20…100 %
press
or
button.
3. To conrm setting either press but-
ton or wait (
displayed).
NOTE: The Light works independently of the Pilot ame. If you
want the light on but no ame, press
button.