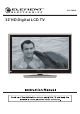
ELCFW328 32"HD Digital LCD TV
TABLE OF CONTENTS 1 I M P O R TA N T INFORMATION 2 2 PREFACE 4 3 SAFETY PRECAUTIONS 4 4 IN THE CARTON 6 5 FRONT/BACK CONNECTIONS OF LCD TV 7 6 7 8 9 10 TV INSTALLATI ON DRAWINGS REMOTE CONTROL MENU OPERATION Power Cord Connection 8 Antenna Connection 8 AV Connection 9 YPbPr (c omponent ) Connection 9 VGA ( PC ) Connection 10 COAXIAL Connection 10 HDMI Connection 11 Service Port Function 11 Remote control instructions 12 Remote control setup 14 Basic Operations 15
IMPORTANT INFORMATION The lightning flash with arrowhead symbol, within an equilateral triangle, is intended to alert the user to the presence of un-insulated dangerous voltage within the products enclosure that may be of sufficient magnitude to constitute a risk of electric to persons. The exclamation point within an equilateral triangle is interded to aler the user to the presence of important operating and maintenance (servicing) instruction the literature accompanying the appliance.
IMPORTANT INFORMATION Important Safety Instructions Note: 1.Read these instructions. 2.Keep these instructions. 3.Heed all warnings. 4.Follow all instructions. 5.Do not use near water. 6.Clean only with dry cloth. 7.Do not block any ventilation openings. Install in accordance with the manufacturer's instructions. 8.Do not install near any heat sources such as radiators, heat registers, stoves, or other apparatus (including amplifiers) that produce heat. 9.
PREFACE 2. PREFACE Thank you for buying this TV! Please read this manual thoroughly before operating the TV. Make sure the TV was not damaged in transit. Should the TV be damaged, do not install it and contact your dealer. Check that you have all the accessories according to the model. 3. SAFETY PRECAUTIONS Put the TV on a stable surface. Do not place any material on the TV.
SAFETY PRECAUTIONS Keep the TV dry and away from humidity. Keep the TV away from heat sources . Unplug the TV before cleaning it. Do not use solvent or liquid to clean the TV. Only clean the TV with a soft and dry cloth. In case of troubleshooting, do not use spare parts other than those suggested by the manufacturer. Using inadequate spare parts can lead to electric shocks, short-circuits , fire or other incidents. Unplug the TV during lightning storms or when unused for long periods of time.
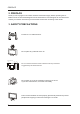
IN THE CARTON 4. IN THE CARTON LCD TV SET Remote Control 1.5V 1.
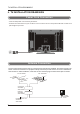
FRONT/BACK CONNECTIONS OF LCD TV 5. FRONT/BACK CONNECTIONS OF LCD TV Front View 1. Press “INPUT” to select the input source. 1 2 2. Press “MENU” to bring up the main menu on the screen. 4 4. Press “VOL+” or “VOL-” to increase or decrease the volume. 5 > 3. Press “CH ” or “CH ” to scan through channels. < 3 5. Press “POWER” button to turn the TV on or off. 6. REMOTE SENSOR: Infrared sensor for the remote control. 7. POWER INDICATOR: Shows red in standby mode. Shows blue when your TV is turned on.
TV INSTALL ATION DRAWINGS 6. TV INSTALL ATION DRAWINGS Power Cord Connection - Connect the power cord correctly as shown. - Press the Power button of your LCD TV to turn on the LCD TV. The power indicator on the front panel lights up in blue. Antenna Connection To ensure good picture and sound, TV antenna system needs to be installed. The antenna system as shown can be sourced from TV equipment shops, which will provide service for correct installation and connection.
TV INSTALL ATION DRAWINGS AV Connection Connect the VIDEO and AUDIO output jack of the DVD or VCR to the VIDEO jacks on the set using the RCA cable. Match the jack colors: Video is yellow, Audio left is white, and Audio right is red. Select the AV input source using the SOURCE button on the remote control. TV Back Video Cable Audio Cable VIDEO R L DVD or VCR Back DVD or VCR YPbPr (Component) Connection Connect the YPbPr output of the DVD or VCR to the YPbPr input on the set.
TV INSTALL ATION DRAWINGS VGA(PC) Connection Connect the RGB output of the PC to the VGA(PC) jack on the set. Connect the AUDIO output of the PC to the PC AUDIO jack on the set . Select the VGA input source using the SOURCE button on the remote control. TV Back Audio Cable AUDIO VGA Cable RGB-PC OUTPUT COAXIAL Connection Connect to Audio Amplifier device to the Coaxial output jack on the TV.
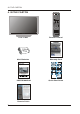
TV INSTALL ATION DRAWINGS HDMI Connection HDMI plug which replaces the HDMI connection allows transfer of all audio/video/control signals through one cable only. These signals are transferred in digital. TV Back HDMI Cable DVD Back Service Port Function Service port: (For factory uses only.) TV Back USB Cable Wall Mounting The TV is provided with mounting holes for a VESA approved wall mounting bracket (NOT SUPPLIED).
REMOTE CONTROL 7 . REMOTE CONTROL Remote control instructions 1 2 3 4 5 6 7 9 8 10 13 11 15 12 16 14 17 18 19 20 21 22 24 23 Note: The picture of remote controller is only for reference and is subject to the real one.
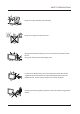
REMOTE CONTROL 1 : Turn the LCD TV ON or OFF. 2 : Press to mute the sound. Press again or press Vol+ to un-mute the TV. 3 NUMBER BUTTONS: Press 0-9 to directly change the TV channel. 4 5 - : Press this button to enter a program number for multiple program channel such as 2-1,etc. : Return to the previous channel viewed. 6 P.MODE: Press repeatedly to cycle through the available video picture modes. 7 S.MODE: Press to cycle through the different sound settings.
REMOTE CONTROL Remote control setup 1. Open the cover. 2. Use two AAA size batteries.When inserting the batteries, make sure correct polarities “+”and “-” marks on the batteries line up correctly with compartment markings . 3. Replace the battery cover. To prevent battery leakage which may result in bodily injury or damage to the remote: 1. Install all batteries correctly, and as marked on the remote control. 2. Do not mix alkaline, standard (carbon-zinc) or rechargeable (ni-cad, ni-mh, etc.) Batteries.
MENU OPERATION 8. MENU OPERATION Basic Operations Select Your Onscreen Language Preference Note: If using your LCD TV for the first time, you should select the language which will be used for displaying menus and information boxes. Press button to select Menu Language. Press button to select your desired language. When you are satisfied with your choice, press the MENU to exit. Volume Adjustment 1.Press VOL +/- to adjust the volume. 2.
MENU OPERATION Choosing a TV Channel > < 1. Press the CH /CH at the side of the panel or CH+/CH- on the remote control to scan through channels. 2. Enter the channel number with the 0-9 remote keys, then press 'OK' to confirm. Selecting Input Source You can display the input screen menu by pressing SOURCE on the remote control or INPUT at the side of the panel, press button to select, press “OK” to confirm.
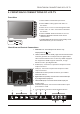
MENU OPERATION Audio Menu Options Press MENU at the side of the panel or on the remote control and then use AUDIO menu, press to move the or OK to enter (see picture below). NOTE: Adjust the parameters of the sound, the Sound Mode is automatically converted to User Mode. Sound Mode Press and then use to select Standard, Music, Movie or User. Bass Press and then use increase or decrease the level of the lower-pitched sounds.
MENU OPERATION Setup Menu Options Press the MENU at the side of the panel or on the remote control and then use SETUP menu, press to move the or OK to enter (see picture below). Menu Language Press and then use to select menu language among: English, Français or Español. Transparency Press and then use transparency function. Zoom Mode to turn on or off the Press and then use to select the zoom mode among: Wide, Zoom, Cinema or Normal.
MENU OPERATION Lock Menu Options Press the MENU at the side of the panel or on the remote control and then use LOCK menu, press to move the or OK to enter (see picture below). Use the numeric keys to input 4-digital password, then the screen will display the junior menu. After settings, press MENU button to exit. NOTE: The factory password is 0000. Input 4-digital password MENU MENU Change Password Use button to select the “Change Password” item, then press button to enter into the following menu.
MENU OPERATION Canada Use button to highlight the “Canada” item, then press following menu. button to enter into the Canada English Use buttons to select among: E, C, C8+, G, PG, 14+ and 18+. Canada French Use buttons to select among: E, G, 8ans+, 13ans+, 16ans+ and 18ans+ RRT Setting MENU Rating Region Table setting. Reset RRT Allows you to reset the RRT setting. Clear Lock Clear lock of RRT.
MENU OPERATION Channel Menu Options Press the MENU at the side of the panel or on the remote control and then use CHANNEL menu. Press to move the or OK to enter (see picture below). Air/Cable Allows you to select antenna between Air and Cable. Auto Scan Use press button to highlight “Auto Scan”, then button to enter into the following menu. MENU If you select “Air”as input signal in Antenna item, you can press button to search the channels automatically.
MENU OPERATION Show / Hide Allows you to show or hide the channels. Use button to highlight the “Show / Hide” item, then press button to enter into the following menu. Use button to highlight the desired item, then press OK button to show or hide the highlighted channel. Channel Channel Name Add/Delete 3-0 9-1 KQED-HD 9-2 ENCORE 11-0 Channel No. Display the number of current channel. Press 'OK' change Channel Label Display the label of current channel.
TROUBLESHOOTING 9. TROUBLESHOOTING Please check if you can solve problems by troubleshooting yourself . Troubleshooting No signal No color shades Stain on the screen Double or multiple display image Control Please check that all cables are correctly plugged in. Adjust the contrast, the color and the brightness. May be the result from a lighting signal from car, motor, neon light and other electrical devices or appliances.
SPECIFICATIONS 10. SPECIFICATIONS This manual is only for your reference, any change to the design and specification will not be advised. Screen Size 31.