
User Manual


Windows will then install the device. After a successful installation the device can be found as
„PS2000 Single“ in the device manager, in section „Ports (COM & LPT)“.
Note: The COM port number 8 above is only an example. Windows assigns a new COM port for
every new device of this type that is installed in the system. The port is remembered and used
again if the device is connected the next time.
Note: In case there are multiple units connected to the PC, they will all be listed as single devices
in the device manager.
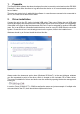
3. EasyPS2000 software installation
To install the EasyPS200 software, double-click the le „setup.exe“ in the folder \install of the
included install CD. You will be guided through the installation process.
Note: the installer installs a „LabView Runtime Engine“, which is required for the software to run
and which requests you to accept two EULAs. Furthermore, there are services installed which
are related to the runtime engine. Those services are not required to be running when using
EasyPS2000, so they can be set to „deactivated“ or „manual“ in the Windows services console.
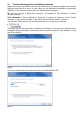
The installation requires to restart Windows, because a new font „7 Segment“ is installed. If the
font or a similar one with the same name is already on the system, it is not replaced by the instal-
lation. Then it may come to display errors like this:
Figure 4
To circumvent this problem, any existing font „7 Segment“ has to be deleted from the system. In
order to do this, open the font list window in
Start Control panel Fonts
and nd font „7 Segment“ in the list. Then right-click and select „Delete“.
Note: in Windows 7 the fonts may appear in grouped view, if multiple styles of one font are in-
stalled. It means, all versions of the font have to deleted.
After this repeat the installation of EasyPS2000.