
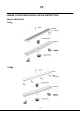
Installation Guide


**
5 / 6
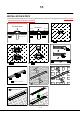
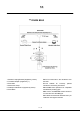
STEP2. Carefully measure the inside opening frame of the tray, cut the insert-tile as required size, maximum tile thickness
14mm. (Figures in picture2 are for reference only.)
STEP3. Put the strainer, tray and the finished tile in the drain body successively.
Note about step3:
① Optional: Apply adhesive or silicone on the back and perimeter of tile before laying. If you do, please scrape the excess
tile adhesive, clean up the tile surface and the tray after laying.
② Tile surface should not be lower than the tray edge to avoid ponding water.
Note: do not use your shower for 48 hours after installation.
CARE & MAINTENANCE
After installation, some aggressive substance such as sealant, adhesive, mortar maybe cause a “yellow spot” on the channel,
we recommend using a scour pad to remove such “spot”, and always brushing in the direction of the grain. Periodically clean
the fixture with non-abrasive cleaner or soft scrub.
For polished, matte black and oil rubbed bronze finishes, we recommend cleaning with mild soap and soft cloth.
Do not use abrasive cleaners, ammoniated products, rubbing alcohol, detergents, astringents, bleach-based cleaners,
aggressive chemicals, abrasive cleaning pad, or harsh polishes on the fixture. The use of such substances may void the
warranty.
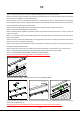
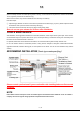
RECOMMEND INSTALLATION (Sheet-type waterproofing)
Please consult a professional if you are unfamiliar with installing bathroom fixtures and
plumbing.
NOTE
Please make sure that each part is fit for its intended purpose and that the actual conditions of use are suitable. **
company reserves the right to change products and specifications without notice.