
Installation Guide


**
2 / 6
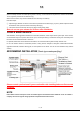
NOTE
Thoroughly inspect the product and its components before installation. Please report any damaged or missing components
to ** for a replacement, return or repair. Your request will be responded to within 2 working days.
The information provided in this instruction guide are general guidelines and a licensed professional should always be present
during installation. Consult local building codes to ensure the installation complies with the standards in your area. The
warranty will be void if the product is installed with a conspicuous defect.
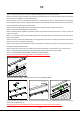
*Carefully check the parts for the completeness of your received fixture before
installation.
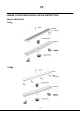
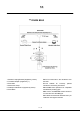
TYPICAL DRAIN PLACEMENT
Whether for a renovation or a new construction, choosing the drain location is contingent on the waste line location, which
may be predetermined or already installed. Moving a waste line may be possible, depending on site condition.
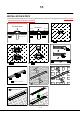
PREPARATION
The substrate should be smooth, level, clean and free of all dirt, oil, laitance, paint, concrete sealers or curing compounds.
Dry dusty concrete slabs or masonry should be dampened and excess water should also be swept off.
The following tools and materials may be needed: Hole Saw, Crescent wrench, Level, Utility Knife, Ruler or Tape measure,
pencil, Notched Trowel, Weep protectors, Silicone, Solvent Cement.
For the traditional type of waterproofing, the professional should build a shower pan in the wet/shower area with PVC, Vinyl,
Lead of fiberglass material, then the drain usually connect to the waste line with a mechanical clamp down drain flange (drain
base), for models that do not include such a flange it is recommended to purchase one separately before installation.
ENTRANCE
Flow
Flow
ENTRANCE
ENTRANCE
ENTRANCE
Flow
Flow
Multi-unit shower room
ENTRANCE
Flow