
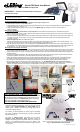
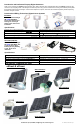
Instructions / Assembly

“AUTO” MODE of Operation
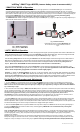
“eLEDing” SMART Light MODES (remove battery cover to access switch)
Factory default is SMART Mode
Fig. 3 SMART & AUTO Mode
“SMART-ON” MODE of Operation
In SMART-ON MODE with the switch position set to SMART the solar light operates as a true Dusk to Dawn light. The unit senses its
surrounding ambient light level and will turn ON in darkness providing adjustable moonlight soft glow lighting all night long. An innovative
dimming adjustment feature allows the user to adjust the soft glow lighting so that it can be dimmed to a level of 10% to 50% of max brightness.
When motion is detected it lights up to it’s maximum brightness within the set sensitivity range. For new installations or if replacing existing AC
light applications SMART-ON is the recommended mode when used as an outdoor or indoor light for Security and Safety lighting.
It can also be used to enhance CCTV applications to illuminate coverage area of the camera.
The SMART-ON MODE enables the light to be optimized by using the Left Dial (Ref. Fig. 2, page 1) to adjust the way the light brightens up or
dims down after motion has been detected.
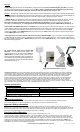
X
X
Fig. 4 Unusual Positions
X
Light Head must only be mounted VERTICALLY only.
Do not mount in any unusual positions as shown in
Fig.4
Rev. EE818plus 01122016 Page 2
In AUTO MODE the solar light operates as a motion sensing light and it lights up to full brightness when motion is detected. The
motion Sensitivity/Range can be adjusted by turning the Right Dial. The Delay
I
lluminating time, which is the length of time that
the light stays on after activation, can be adjusted by turning the Left Dial (Ref. Fig. 2, page 1).
The illuminating Delay Time can be set using the Left Dial to set the desired length of time for the light to be on after motion is
detected. It is adjustable from 5 to 180 seconds. The length of time the light will stay ON is automatically extended as long as
motion is continually detected and It will not turn off until the motion has stopped and after the illuminating Delay Time has
expired. (When set to AUTO MODE the max illumination time of 180 seconds is recommended.)
The motion Sensitivity/Range can be set using the Right Dial to set the desired sensitivity/Range for the application. This
adjustment has a motion sensing range from Low 10’, Med. 35’, High 60’+(For most applications set the dial to between M-H,
and for warmer temperature geographical environments set this slightly higher.)
Cautions: 1) Adjust the Sensitivity/Range so that it is not set too sensitive, this will increase false activations and reduce
stored battery energy. 2) If the IPM feature detects that the battery does not have enough stored energy to operate at full
brightness when AUTO MODE is set then it will automatically reduce the light level to half brightness in order to maintain a level
of safe lighting until it again receives enough sunlight in good weather condition to restore it back to normal status.
Set Up-Walk Test Procedure and Adjustments
1. To set up eLEDing for your applications the unit comes with a Set-up/Walk Test mode to ensure proper installation and performance is
optimized. To activate this mode move the main switch from OFF to SMART position and the inside mode set to AUTO (Fig. 3). This Set-up/
Walk Test mode can be reactivated at anytime to adjust your settings for your application by sliding the switch to OFF then SMART in
any condition day or night.
2. When the main switch is set initially to SMART from the OFF position for a period of 10 minutes the Set-up/Test mode will be active allowing
the user to adjust the light settings. This mode will work in day or night time conditions. The length of Delay Time for light illumination can be
adjusted at this time for your application from 5 seconds minimum to 180 seconds maximum. During this Set-up/Test mode set this time to 5
seconds for testing purposes and when you are satisfied with your set up then set it to your application (180 seconds is
recommended). The Motion Sensitivity/Range can be adjusted at this time for your application from 10' minimum to 60'+ maximum, also in
conjunction adjust the motion detector head using the Pan and Tilt feature for your application during this time.
3. The Set-up/Walk Test mode is active as long as motion is seen or will automatically disable if 10 minutes has passed without motion being
detected. During this mode, the indicating Red LED light will flash through the motion detection lens providing visual confirmation of motion
detection adjustments. When a period of 10 minutes passes without motion detection the unit will automatically switch to normal operation mode
and will start illuminating once it senses a change to darkness from daylight ambient light conditions.
4. After the initial Set-up/Walk Test is complete the MODE switch may either be kept in the AUTO mode for Security sensing flood lighting or
moved to the SMART-ON mode for Dusk-to-Dawn security and safety lighting. SMART-ON is the recommended mode providing both
Security and Safety lighting.
Note: The Red LED indicator light inside the ball head flashes for the following reasons: 1) To indicate motion activity during the 10 minutes
initial Set up/Walk Test. 2) To indicate the battery is low when the sensor detects motion during darkness. 3) To indicate charging status during
normal charging either in sunny, partly cloudy and cloudy daytime periods, or when the AC/DC-digital charger (option) is being used for
charging in any conditions.
Storage: If this unit has been stored over six months before initial operation then the battery may need to be re-charged. To re-charge the
battery after storage turn the main switch to OFF, connect the battery, plug the wire cord from the solar panel to the light and place it in direct
sunlight for 1-2 days. Or charge for 2-3 hours using only our optional accessory AC-DC Digital/Switched Power Adapter (EE-DPS-0.8A).