
User manual

Bijou
9
switch is in the OFF position.
2. Plug the parallel blade U-Ground end into a
surge protected outlet. DO NOT plug the
console into the same outlet/circuit with
motors or SCR/TRIAC controlled devices.
3. Locate and plug the optional Alphanumeric
Keyboard into its jack located on the back of
the console.
Note: The Bijou is designed to operate with
any standard PC/AT keyboard. The console
can be shipped with a remote keyboard as
optional equipment. Some manufacturers of
AT after-market keyboards are known to be
incompatible.
4. Assemble the VGA/SVGA monitor.
A. Plug in the parallel blade U-Ground plug
into a grounded outlet.
B. Plug the video cable into the D15, 3 row,
video standard plug located on the back
of the control console.
C. Locate the ON/OFF switch on the monitor
and turn it to the ON position.
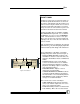
5. Locate the DMX cable.
A. Plug the DMX cable into the 1-512 DMX
output jack.
B. Plug the other end of the DMX cord into a
DMX input jack connected to the
dimmers.
6. Locate the disk drive on the right end of the
control console (when viewed from an
operator’s position).
A. Push the eject button. This ejects the
plastic protector sheet that was placed in
the drive for transport.
B. Insert any 3.5”, 1.44 MB, high-density,
PC formatted disk into the disk drive. Un-
formatted disks must be formatted prior
to recording show information to disk.
C. Disks can be formatted on any standard
PC.
7. Find the ON/OFF switch located on the back
of the control console and turn the switch to
ON. This lights two blue LEDs, dotting the I &
J in the Bijou name on the front of the
console. The console boots up with the Stage
Screen ON, and the display ready for
operation.