
User manual


Bijou
78
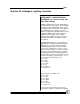
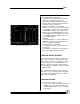
Example:
1. Group the attributes in pages (since there are
more attributes than wheels). It does not have
to be sequential.
2. Put Pan and Tilt on X and Y.
3. Put Focus, Dimmer, and Shutter on one
page.
4. Put Colors on another page.
5. Put Gobos on another page.
6. Press [F3] to select the source from the
source options column.
7. Select the desired wheel and page by using
the table on the right hand of the screen.
PAGE 1 is the default of each letter. Although
the source options to the right may state: 3: A
PAGE 1, it only appears as A on the Type
Setup Screen (see example on Figure 84.
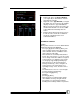
8. Move the yellow pointer up to the top for
more attributes.
9. Type in the attribute number and press
[Enter].
10. Repeat the above steps for the new attribute
type.
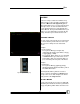
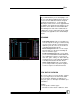
DEVICE SETUP SCREEN
In the Device Setup screen (Figure 85), assign
each physical device to the attribute type (that
was created in the Type Setup Screen) and its
starting DMX address. You can assign up to 40
devices. Note that if you want two or more de-
vices to act identically, set the DMX address on
the units to the same address and treat them as a
single device on the Bijou Plus/Control Freak.
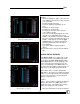
On the device, there is a way to program the
DMX address. The devices need different starting
addresses to run independently. The starting ad-
dress has to be spaced to cover the amount of
attributes each device has.
Example:
Device 1 starts at address 5 and has 10 attributes
(all 8-bit). This device uses DMX addresses 5
through 14, one for each attribute. So you must
address the next device at 15 or higher.
1. Move the yellow pointer to the desired device
Figure 85-Device Setup Screen
Figure 86-Device Setup Screen
with start addresses assigned
Figure 84-Type Setup Screen
with Assigned Attributes Wheels