
User manual


Bijou
26
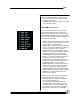
8. Press [8] (Save All) [Enter] from the Save To
Disk screen.
9. Eject the disk once everything is saved.
10. Write the time and date on the disk.
11. Write your name and the date on the new
disk and insert it into the disk drive.
12. Use the [Last] key to go the Clear Functions.
13. Hit [0] Clear All [Enter]. This removes any
prerecorded show information from the sys-
tem.
PATCH SCREEN
To begin, you need to understand what a patch
is. In lighting systems, many light fixtures must
“plug” into dimmer circuits. When several light
fixtures are used together and do not need indi-
vidual control, the light fixtures may be “plugged”
into a single dimmer. Often, fixtures on many dim-
mers are performing the same functions and can
be controlled together. An example of this is the
dimmers that control the auditorium house lights.
In many cases, it would be nice to control all of
the house lights on one Channel/Fader. To do
this, dimmers are Patched (plugged into) a Chan-
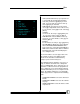
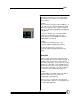
nel/Fader via the Patch Screen (Figure 31). Al-
though the Patch Screen lists DMR (dimmers),
this is a DMX control address. In addition, dim-
mers can be used to control any device that uses
USITT DMX 512 control protocol for its operation.
This can include items such as: color scrollers,
moving lights, fog machines, relay panels, etc.
To get to the Patch Screen, push the [Patch/
Profile] key once. The Patch Screen appears on
the display. The Bijou has two patch tables that
can be modified by the user and one default (one-
to-one) patch that cannot be modified. The patch
allows you to assign one or more dimmers to a
channel. You can assign a fade-in curve for each
dimmer. In addition, dimmers can be Parked or
changed to Non-Dim units in this screen.
To select PATCH Page 1 or PATCH Page 2 for
modification, press the [F2] followed by [1] [Enter]
or [2] [Enter
].
Figure 31-Patch Screen